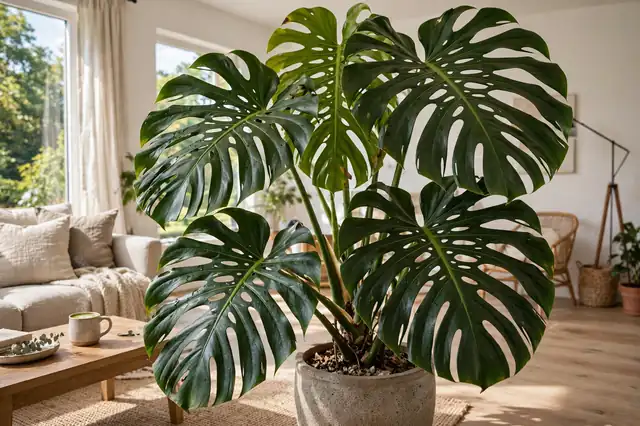
The Complete Monstera Deliciosa Care Guide: Light, Water, Support & Split Leaves
Almost every monstera question I’ve ever been asked — why won’t it split, why is it leaning, why did that leaf come out small and plain — traces back to one fact about this plant that the nursery tag doesn’t mention: a monstera is a climber that starts life on the forest floor. In its native forests, from Mexico down through Central America, a seedling monstera crawls across the dim ground until it finds a tree trunk, and then it climbs — toward the light, up into the canopy, growing bigger and more dramatically cut leaves the higher it gets. The potted plant on your floor is running that same program in your living room. It is looking for two things: more light than it probably has, and something to climb.
Get those two levers roughly right and monstera care becomes genuinely easy. Get them wrong and no amount of misting, feeding, or fussing will compensate — the plant will sit there, alive but plain, growing slowly toward whatever light it can find. This guide walks through everything: the light, the famous split leaves and how they actually form, watering, the chunky soil recipe, honest sizing (this plant gets bigger than most people plan for), supports, pruning, propagation, the varieties worth knowing, and the short version of every common problem.
One naming note before we start, because it causes real confusion in shops: the monstera is not a philodendron. “Split-leaf philodendron” is an old trade name stuck to the wrong genus — they’re cousins in the same plant family, which is why the care overlaps, but Monstera deliciosa is its own plant. And the “Swiss cheese plant” nickname gets shared with at least two smaller monstera species, so check the Latin name on the label if size matters to you. It will.
Quick-Start Summary: The Essentials at a Glance
| Need | What to do |
|---|---|
| Light | Bright indirect, as much as you can give; tolerates medium light but stays smaller and plainer |
| Water | When the top 2 inches of soil are dry — then soak thoroughly and drain fully |
| Soil | Chunky, airy aroid mix (recipe below); pot must have drainage holes |
| Feeding | Half-strength balanced fertilizer, monthly in spring and summer; none in winter |
| Temperature | 65–85°F is home; keep above about 55°F and off cold glass |
| Humidity | Ordinary room air is fine — appreciated if higher, never demanded |
| Support | A moss pole or plank if you want big, split leaves; optional for the plant’s health |
| Growth | Fast in good light; plan on 6–8 feet tall and several feet wide |
| Pets | Toxic if chewed — place out of nibbling reach |
Keep that table and you can keep a monstera. Everything below is the why, the how, and the honest version of a few things most guides get wrong.
Light: The Growth Engine
Light is not one factor among many for a monstera — it is the budget everything else is paid from. Leaf size, leaf splits, growth speed, how much water the plant uses, even whether it needs feeding: all of it is downstream of how much light the plant is working with. So let’s translate “bright indirect light” into rooms, because that phrase has launched a thousand dim-corner monsteras.
Bright indirect light means a spot right up against an east window; a few feet back from a south or west window; or a bright windowsill softened by a sheer curtain. The room is properly lit all day, you could read in it comfortably at noon, but the sun’s rays aren’t parked on the leaves for hours. A monstera in that spot, in the growing season, is a fast plant — a new leaf every month or so is normal, each one typically bigger than the last.
Medium light — several feet from the window, or a bright room the sun never enters — is where most indoor monsteras actually live, and the honest verdict is: fine, but slower and plainer. The plant survives perfectly well. It just pays for the dimness in the currencies it has: growth slows, the gaps between leaves stretch out as the stem reaches for brightness, and new leaves come in smaller and mostly solid. Nothing is broken. The plant is budgeting.
Low light — the hallway corner, the room with one small north window — is survival mode. A monstera will endure it for a long time, but it will not grow in any way you’d notice, and it should be watered like it’s asleep, because a plant using almost no light is drinking almost no water.
The direct-sun nuance most guides skip. You’ll read everywhere that direct sun scorches monstera leaves, full stop. The truth is narrower: a leaf that grew in shade will scorch if the plant is suddenly moved into hours of hard sun, because that leaf was built for dim conditions. But monsteras can be acclimated. Move the plant toward stronger light in steps over a week or two — an hour or two of morning sun at first, then more — and the new leaves it produces are built for the brighter life and handle direct morning sun, and even a few hours of stronger sun, without complaint. Morning sun from an east window is the gentle on-ramp. What never works is the overnight move from a dim corner to a blazing south windowsill in June: the existing leaves pay for that one.
Two smaller habits: rotate the pot a quarter-turn every week or two — a monstera throws all its leaves toward the light, and an unrotated plant becomes a one-sided plant leaning out of its pot (more on that in the support section; this plant has a front and a back, and it matters). And if your brightest spot still produces small, solid leaves, a simple LED grow light on a timer for 12 hours a day is a legitimate fix, not a gimmick — for a plant whose whole problem is an energy budget, added light is the one intervention that changes the budget itself.
Fenestrations: The Splits and Holes, Explained Properly
The cut leaves are why most of us bought the plant, so let’s be precise about what they are. A mature monstera leaf can have two kinds of openings: splits — cuts that run from the leaf’s edge inward toward the midrib — and holes (the actual “fenestrations”) — closed perforations in the blade itself, usually in rows along the midrib. They’re often talked about as if they were two different features. They’re not. They’re two expressions of a single leaf-maturity program, and once you understand the program, most monstera mysteries solve themselves.
Here’s the part almost nobody explains: a leaf’s pattern is decided before the leaf unfurls. A new monstera leaf emerges as a rolled spike, and everything about it — its size, its splits, its holes — was determined while it formed inside the stem, based on the plant’s age, its stored energy, and above all the light it has been getting. Once a leaf is open, its pattern never changes. A solid leaf will not cut itself later in better light. A small leaf will not grow bigger. Each new leaf is a fresh verdict on the conditions of the last few weeks — which means the leaf unfurling today is a report card on last month’s light, and the way to fix next season’s leaves is to fix conditions now.
Young monsteras make solid, heart-shaped leaves. That’s not failure; it’s childhood. The splits and holes arrive as the plant matures — and in the wild, maturity is tied to climbing: the higher the plant climbs toward the canopy light, the bigger and more cut its leaves become. Indoors, we can’t offer a tree, but the two ingredients the plant is actually reading are the same ones we can control: light first (a bright plant matures its leaf program; a dim one keeps producing juvenile leaves indefinitely, whatever its age), and support second (a plant whose aerial roots have gripped something vertical gets the climbing signal and sizes its leaves up accordingly).
Why do the leaves cut at all, in evolutionary terms? Honestly — nobody knows for certain. The leading ideas involve catching flecks of light in the dappled understory with less tissue, or shedding wind and rain. Anyone who tells you the answer is settled is overstating it, and fortunately the care doesn’t depend on it: whatever the holes are for, the plant builds them when it’s mature, climbing, and well lit.
So when a reader asks “why is my monstera not splitting,” the care-guide answer is: check the light first, then the plant’s age, then whether it has anything to climb. The full pattern-by-pattern diagnosis — including the cases where light is fine and something else is going on — lives in our guide to why a monstera is not splitting, which is where that fight is properly fought. This page’s job is to make sure the everyday care never creates the problem in the first place.
The timeline at a glance (assuming decent light — in dim rooms, every stage runs late):
| Plant age / stage | What you’ll see |
|---|---|
| Young (under 1 year) | Small solid heart-shaped leaves, no splits |
| Juvenile (1–2 years) | Larger solid leaves; first tiny slits may appear near the midrib |
| Sub-adult (2–3 years) | Clear fenestrations on new leaves in good light |
| Mature (3+ years) | Deep splits + inner holes (double fenestration) on big leaves |
Speed it up: bright indirect light (the #1 factor), a support to climb, consistent feeding in the growing season, and warmth. What won’t help: misting the leaves (it doesn’t trigger splits), fertilizing a dark plant (light is the bottleneck), or believing “split-leaf” promises about tiny juveniles.
Watering: Soak, Drain, and Let the Top Dry
A monstera’s watering rule has two halves, and most trouble comes from following only one of them. Half one: when you water, water thoroughly — pour slowly until the whole root ball is wetted and water runs freely from the drainage holes. Half two: then don’t water again until the top couple of inches of soil have dried out. In a bright room in summer that might be every week or so; in a dim room or in winter, every two to three weeks is common. The soil makes the call; the calendar just reminds you to check.
Three ways to check, in ascending order of reliability. The finger test: push a finger two inches in — dry and clean means water, cool and damp means wait. The skewer test: a wooden skewer pushed deeper reads the lower pot, where it matters; damp mix clings to it. And the pot-weight check, the one experienced growers actually use: lift the pot right after a full watering and memorize the heaviness, then lift before watering. A dry monstera pot is noticeably lighter, and after a few cycles your arm is a better meter than any gadget you can stick in the soil.
The pattern underneath: a monstera would rather be a little too dry than a little too wet, every time. Its thick roots store some water, and a thirsty plant announces itself reversibly — leaves droop a bit, feel less firm — and perks up within hours of a drink. A chronically overwatered plant is in real trouble: roots suffocate in airless, saturated mix, rot organisms move in, and the first visible symptom above ground is yellow leaves, which look confusingly like several other problems. If the soil is wet and the plant looks unhappy, more water is never the answer. The answer is air, light, and time.
Two practical corollaries. Always empty the saucer or cachepot after watering — a monstera standing in its own runoff is a monstera whose lowest roots are drowning, whatever the top of the pot feels like. And water less whenever the plant is growing less: winter, a dim room, the weeks after a repot. Water use follows growth, and growth follows light.
Aerial roots, honestly. As a monstera matures it pushes out thick, brown, rope-like roots from the stem nodes — aerial roots. New owners often read them as a cry for help or a watering gauge. They’re neither. In the wild these roots are the climbing gear: they grip bark, anchor the plant, and absorb moisture from the surface they’re gripping. Indoors, they’re a sign the plant is ready to climb. Your options are all legitimate: guide them onto the moss pole or down into the soil (a root that reaches soil will happily become a soil root and feed the plant), let them hang if you like the wild look, or trim the ones heading into your bookshelf — cutting an aerial root does the plant no meaningful harm. What they don’t do is drink usefully from dry room air, and a plant pushing out aerial roots is not asking for more water in the pot. It’s asking for a tree. The support section is next door for exactly that reason.
Soil & Potting: Chunky Mix and an Honest Sense of Scale
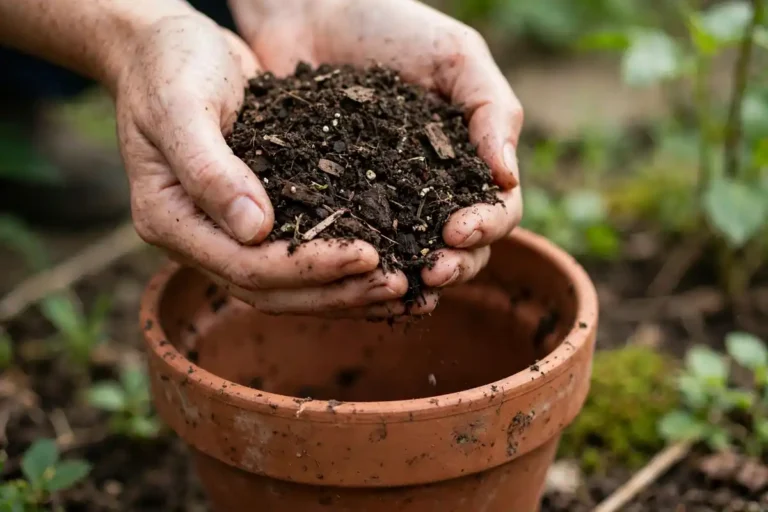
A monstera’s roots evolved running through bark, leaf litter, and air pockets — never through anything like dense potting soil. The mix you want is visibly chunky: water should run through it in seconds, and the roots should always be able to find air. Here’s the recipe I pot all my monsteras in:
- 2 parts regular houseplant potting mix (the base — holds moisture, carries the plant)
- 1 part orchid bark (creates the air pockets roots breathe through)
- 1 part perlite or pumice (keeps the mix from compacting back down over time)
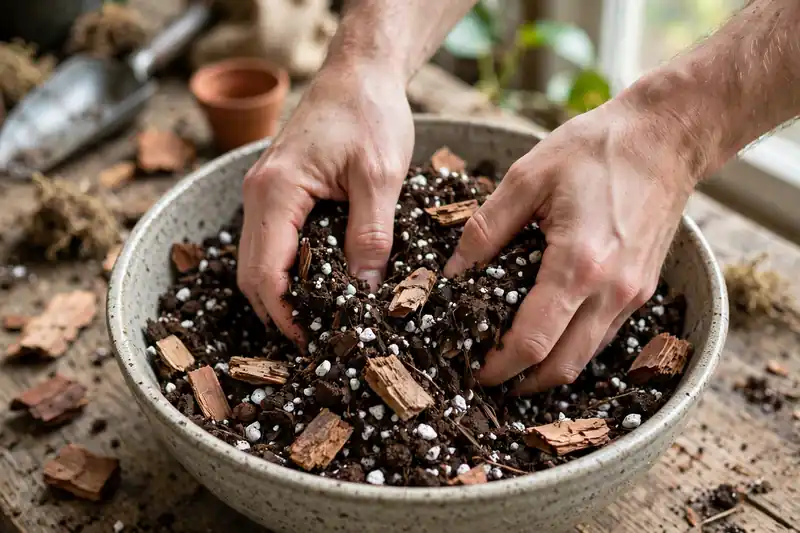
Stirred together it should look coarse, almost like mulch with soil in it rather than soil with mulch in it. Plain potting mix straight from the bag will grow a monstera — people do it all the time — but it compacts over a year or two into exactly the dense, wet, airless environment that rots these roots, and most “mystery declines” I see are a two-year-old pot of exhausted mix. A bagged aroid or orchid mix is a fine shortcut; a handful of extra perlite in ordinary mix is a decent one.
The pot rules. Drainage holes: non-negotiable, no exceptions — a sealed decorative pot is where monsteras go to rot; keep the plant in a nursery pot inside the pretty pot and lift it out to water. Size: go up one size at a time, an inch or two wider than the current pot. A small root ball in a big pot is surrounded by a sea of wet mix no roots are drinking from, and wet, rootless mix sours. Terracotta breathes and dries fast, which forgives a heavy watering hand and adds stabilizing weight to a top-heavy plant; plastic holds moisture longer, which suits forgetful waterers and big plants you’ll have to move. Both work. Know which keeper you are.
When is a repot due? On evidence, not anniversaries: roots circling out of the drainage holes or heaving the plant upward, water running straight through a root-packed pot so the plant is thirsty again in days, or growth stalling in good light. For a fast grower in bright light that’s typically every year or two; spring is the kindest moment. And repotting is the natural moment to install or upgrade the support — a pole added at repotting, sunk deep and firmed in, will still be steady when the plant is six feet tall; a pole poked into a settled pot wobbles forever.
Now the honest sizing, because this is the section most guides fudge. A monstera is not a tabletop plant that got ambitious. NC State Extension’s Monstera deliciosa profile gives the usual indoor height as 6 to 8 feet, and that’s the height — an unsupported mature plant also sprawls 4 to 6 feet wide, with individual leaves reaching about 18 to 24 inches across indoors and petioles (leaf stalks) like broom handles. In the wild it climbs 30 feet or more; in your home it’s a decade-scale piece of living furniture that will eventually claim a bright corner the way a bookcase does. It will not flower or fruit indoors in any practical sense — that takes a full-size climbing plant under greenhouse conditions — so buy it for the leaves. None of this is a warning against owning one. It’s the opposite: plan the corner, the support, and the pot weight for the plant it’s becoming, and you’ll never be the person trying to give away a six-foot monstera in a panic because it ate the living room. People do. I’ve been offered three.
Feeding: Steady, Modest, Only While Growing
A monstera in active growth is a genuinely hungry plant — all that leaf area gets built out of something — but “hungry” has a schedule. My routine: a balanced liquid houseplant fertilizer at half the label strength, once a month through spring and summer, while the plant is visibly producing new leaves. Nothing from fall through winter, when growth has paused and the plant can’t spend what you give it; unused fertilizer doesn’t vanish, it accumulates in the mix as salts.
Those salts are the main feeding risk. Over months they build up, and the plant’s complaint — brown, crispy leaf edges and tips — looks exactly like half a dozen other problems. Prevention is cheap: once or twice a year, flush the pot by running plain water through it slowly, several pot-volumes’ worth, draining freely out the bottom. And never feed a plant that is stressed, wilting, freshly repotted, or suspected of root trouble — fertilizer on damaged roots is salt on a wound, a comparison that is chemically almost literal here.
The honest calibration in the other direction: a monstera that hasn’t been fed in years, growing in the same mix, will show it — new leaves smaller and paler than they should be in good light. That’s real hunger, and a monthly half-strength feed in the growing season fixes it. But if your plant is pushing big, glossy, well-colored leaves, it is not hungry, whatever the fertilizer aisle suggests. Feeding supports growth the light is already funding; it cannot substitute for the light.
Humidity & Temperature: Appreciated, Not Demanded
You’ll find guides insisting a monstera needs 60% humidity or more, a humidifier, a pebble tray, and a misting ritual. Here’s the calibration from actually growing them in ordinary houses: a monstera is completely at home in the normal 30–50% humidity of a heated or air-conditioned home, and I have never seen one fail from lack of a humidifier. It comes from humid forests and will grow a little faster and glossier in humid air — bathrooms with bright windows grow famously happy monsteras — but “appreciates” is not “requires,” and brown leaf edges blamed on dry air are, in real homes, usually fertilizer salts or watering rhythm wearing a disguise.
There is exactly one dry-air failure that is genuinely about humidity, and it’s worth knowing because it looks alarming: a new leaf that sticks as it unfurls. In very dry air — a plant beside a winter heating vent is the classic case — an emerging leaf can fail to slide free of its sheath, tear itself as it opens, or unfurl with crimped, distorted edges. If you see a furled leaf stalled for days, move the plant away from the vent first; then, if you help, help mechanically and gently: a warm, damp cloth wrapped around the leaf for a few minutes softens the sheath, and the leaf usually frees itself. What doesn’t help is misting — a spritz raises the humidity around a leaf for minutes, does nothing for the air the plant actually lives in, and leaves water sitting in the leaf joints. Grouping plants together and running a humidifier in a dry room are real interventions; the spray bottle is theatre.
Temperature is equally undramatic. The plant is happy in your range: 65–85°F suits it perfectly. It sulks as you approach 55°F, and cold is one of the few things that damages it fast — leaves pressed against freezing window glass on a winter night, or a plant left in an unheated sunroom through a cold snap, come away with dark, water-soaked patches that die back. Keep it off cold glass in hard weather, out of heating-vent blasts and air-conditioning drafts, and temperature will never be the section of this guide you come back to.
Support & Training: The Pole, the Plank, or Nothing at All
This is the decision that shapes what your monstera becomes, so let’s be honest about what support does and doesn’t do. What it does: a monstera whose aerial roots have gripped a vertical surface gets the climbing signal it evolved to read, and responds the way it does up a tree — the stem thickens, the spacing between leaves shortens, and the leaves size up, season over season, toward the big, heavily split blades you see in photographs. It also keeps the plant upright and contained instead of sprawling across the floor. What support does not do: keep the plant alive. A monstera trailing and sprawling off a shelf, unclimbed and unrepentant, can be perfectly healthy — it will simply keep producing smaller, younger-form leaves, because as far as the plant knows it’s still on the forest floor looking for a tree. Support is not a health requirement. It’s how you ask for the mature leaf program. Decide which plant you want and choose accordingly; both are legitimate.
The options, compared honestly:
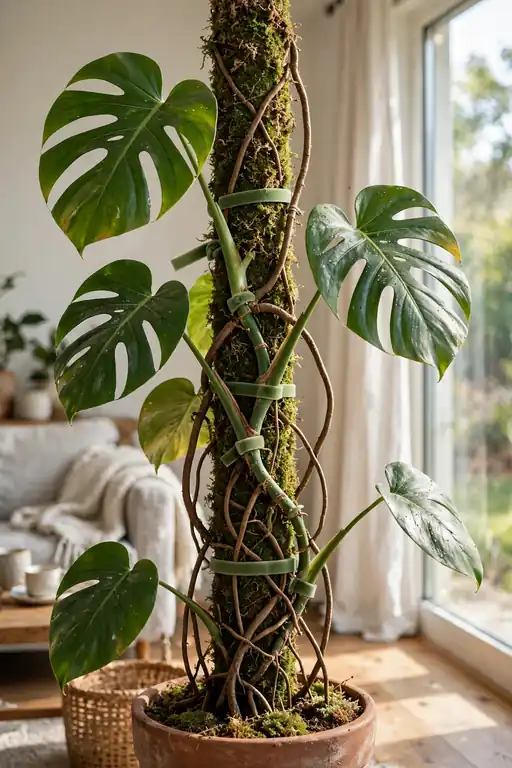
- Sphagnum moss pole — the strongest climbing signal, because it’s the only support the aerial roots can grow into rather than just lean on. The catch is in the fine print almost nobody reads: it only works while the moss stays damp. A bone-dry moss pole is just a stick, and the roots will ignore it. Keeping it damp means pouring a little water down the pole at watering time — a plastic bottle with holes in the cap, parked on top, is the low-effort trick. Highest payoff, highest maintenance.
- Plank or coir pole — a rough cedar plank is what many serious growers end up with: the roots grip the surface, it never sours or dries into irrelevance, and it lasts for years. Coir poles are the tidy shop-bought version — decent grip, nothing to keep moist, slightly less convincing to the roots than real moss or wood. The honest middle ground, and what I’d hand a beginner.
- Nothing / a simple stake — a stake or a wall to lean on keeps the plant from flopping while it sprawls happily at juvenile leaf size. Zero maintenance, zero shame in it.
The fact that makes all of this work: a monstera has a front and a back. Look at the stem. The leaves all face one direction — that’s the front, and it should face the room and the light. The aerial roots emerge from the opposite side of the stem — that’s the back, and it’s the side that wants the tree. So the pole goes behind the stem, on the aerial-root side. This sounds obvious once seen and is gotten wrong constantly: a pole shoved in front, or a plant tied with its leaves facing the wall, will spend the season twisting its new leaves around toward the light and never settle. If you’re adding a pole to an established plant, work out which way it faces first — the direction the newest leaves point is the front — and install the pole at the back.
Tying, done right. The stem needs to rest against the support so the aerial roots can find it: use soft plant ties, velcro strips, or twine, and tie the stem (the thick main stalk, at the bare sections between leaves) — never tie a leaf stalk (petiole). Petioles need to move; they’re the plant’s steering, and a tied petiole is a damaged leaf waiting to happen. Tie loosely — the stem will thicken — and add a tie at each new stretch of growth as it climbs. Press emerging aerial roots gently against a damp pole and they’ll do the attaching themselves. It’s the same climbing bargain its smaller cousin makes — our pothos care guide covers the pole routine for a plant you can practice on at a friendlier size.
Pruning: Where to Cut, and What a Cut Can and Can’t Do
Monstera pruning is mostly subtraction in service of shape, and there are only three cuts you’ll ever make.
Removing a leaf. An old, yellowed, or damaged leaf comes off at the base of its stalk, close to the stem, with clean sharp scissors or pruners. Two honest footnotes: the stalk is the leaf’s whole stem — cut it all, or the leftover stub dies back untidily anyway — and that spot will never grow a replacement leaf. A monstera stem produces leaves at its growing tip; pruning lower leaves is permanent editing, so prune for a reason: damage, disease, a leaf that’s fully yellow and done. A leaf that’s merely imperfect is still feeding the plant.
Taking a cutting (also the height-reset cut). Cut the stem just below a node — the knobbly ring where a leaf and usually an aerial root emerge — keeping at least one node, and ideally a leaf, on the piece you take. The details belong to propagation below, but the pruning fact is this: the mother plant responds to a top cut by activating a node below the cut and pushing a new growing tip from it. That’s how you restart a plant that’s hit the ceiling, and the cut-off top — the plant’s most mature section — roots into the most impressive new plant. Nothing wasted.
Controlling the plant. Be straight about this: a monstera in good light grows, steadily and without asking. If it’s outgrowing its corner, your tools are the top cut above, removing a side stem at its base, and — the underused one — simply giving it less light for a while, which throttles growth more gently than any scissors. What doesn’t work is trimming leaves smaller or pinching tips to keep it petite; that’s fighting the plant’s entire program, and the plant wins. One safety note: monstera sap contains the same calcium oxalate crystals as the leaves — not dangerous on skin for most people, but wash your hands after a pruning session and don’t rub your eyes mid-job.
Propagation: The Node Is the Whole Law
Monstera propagation is easy — famously easy — but it runs on one rule that a great many sad jars of water on windowsills have learned the hard way:
No node, no new plant. A node is the raised ring on the stem where a leaf stalk and aerial roots emerge, and it’s the only place that carries the growth tissue a new stem can come from. A leaf cut without a piece of stem and node — just a leaf and its stalk — can do something that fools people: it may grow roots in water and stay green and alive for a year or more. It will never, ever produce a new leaf or a new stem. Growers call these “zombie leaves,” and shops occasionally sell them to the unwary. If your cutting has no node, enjoy it as a long-lived leaf in a vase, because that’s all it can be.
The rule has a happier reverse: a node without a leaf can still grow. A bare section of stem with a healthy node — a “wet stick” — laid on damp moss or chunky mix in bright light and high ambient moisture will often push out a new growing point from that node, weeks or months later. Slow, not guaranteed, but real — it’s how growers rescue the last piece of a rare variety. What’s truly hopeless is only the leaf alone.
Water propagation (the classic). Take a cutting with at least one node and one leaf; an aerial root already attached is a head start. Cut about an inch below the node with a clean blade. Set the cutting in a jar of plain water with the node submerged and the leaf held above the waterline, on a bright sill out of direct sun. Change the water weekly. In the growing season, roots typically appear in two to four weeks — the aerial root, if present, often converts and branches first. Pot the cutting into chunky mix when the roots are two to three inches long and branching, and keep the mix a touch more moist than usual for the first couple of weeks while the roots adjust to soil.
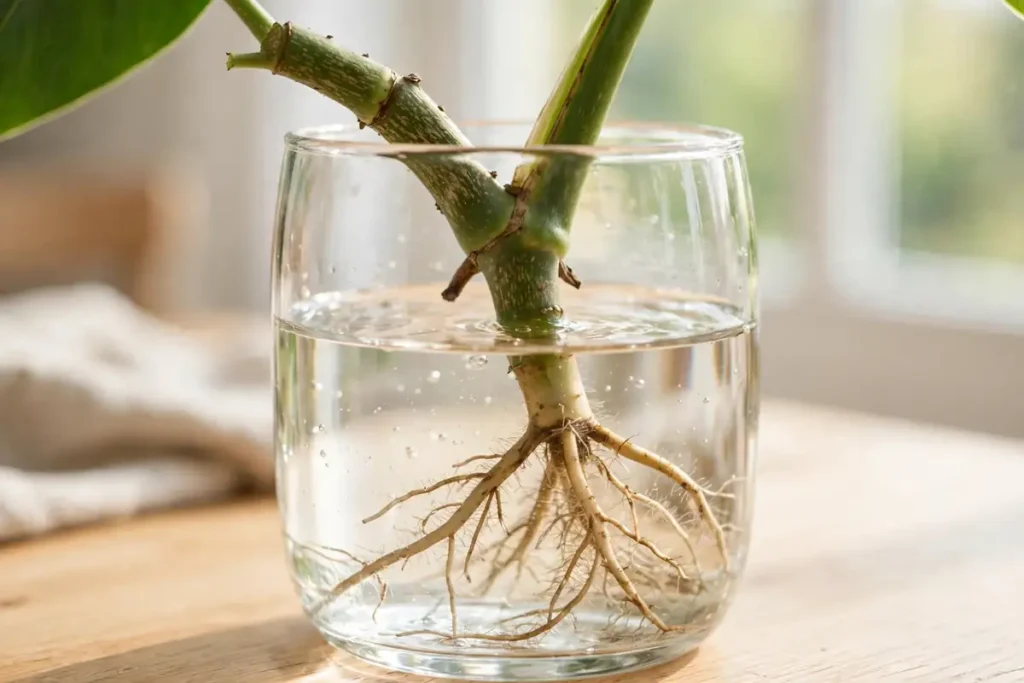
Soil propagation (the shortcut). The same cutting can go straight into a small pot of the chunky mix, node buried, kept evenly moist — not wet — in bright indirect light. No jar stage and no transplant shock, but no window into what’s happening either, and failures are usually invisible rot at the buried node. I root special cuttings in water where I can watch them, and ordinary ones where I can’t be bothered.
Honest timelines, because this is where expectations break. Rooting is the fast part. The slow part is the first new leaf: a rooted cutting commonly sits for weeks after potting before its new growing tip produces one, and a cutting taken in fall or winter may do essentially nothing visible until spring — that’s dormancy, not death, as long as the stem stays firm and green. A top cutting (with the plant’s mature growing tip intact) is the exception: it keeps growing almost without pausing and keeps the mature, split-leaf form. Mid-stem cuttings revert to smaller, juvenile leaves at first and re-mature as they climb — exactly the leaf program from the fenestration section, running again from an earlier chapter.
Air-layering, in brief — the low-risk route for a stem you can’t afford to lose: while the section is still attached to the mother plant, wrap a node and its aerial root in damp sphagnum moss, enclose it in plastic wrap tied at both ends, and wait. Roots grow into the moss over four to eight weeks; only when the node is properly rooted do you cut below it and pot up a plant that never spent a day unrooted. Slower, fussier, and the right choice for a prized variegated stem.
Varieties & Forms at a Glance
All of these are Monstera deliciosa (with one labeling wrinkle, below) and run on the care in this guide. What changes is the light bill: white and cream tissue contains no chlorophyll and does no work, so across the whole family, the more white in the leaf, the more light the plant needs, the slower it grows, and the gentler your watering hand should be — a variegated plant has less engine and less margin.
Standard deliciosa is the benchmark: deep green leaves, the fastest growth of the group, the most forgiving of a dimmer spot or a missed watering. If a care tip in this guide and your green monstera ever disagree, believe the plant — but it’s usually the guide that needs adjusting for the forms below.
“Borsigiana” is the name you’ll meet on smaller, faster-growing plants in shops. Honest version: it’s a long-standing trade name for a form of deliciosa with smaller leaves, tighter spacing between leaves, and a somewhat more vine-like habit — botanists have moved it back and forth between variety, form, and plain synonym over the years, and the name on today’s label is as much horticultural habit as settled taxonomy. What matters practically: it grows faster and stays a bit more compact than the big form, the care is identical, and no, it isn’t a different species — and a plant sold under this name still gets large, just on a slightly smaller scale.
Thai Constellation carries stable, speckled variegation — cream flecks and splashes through the leaf, like a star field. It was produced in a lab by tissue culture, and that origin is the good news: the variegation is in every cell, so it does not revert wholesale the way the Albo can — every new leaf comes out patterned. The cost is speed: with a good share of each leaf doing no photosynthesis, it grows noticeably slower than the green form, wants the brightest indirect spot you have, and rots a touch more readily if kept wet, because a slower plant drinks slower.
Albo (Monstera deliciosa var. borsigiana ‘Albo Variegata’ in the trade) is the dramatic one: bold white sectors and marbling rather than speckles. Its variegation is a chimera — a patchwork of green and white tissue — which makes it unstable in a way the Thai is not. An Albo can throw an all-white leaf (beautiful, and useless: it does no work and eventually browns), or a run of all-green growth that, being all engine, outgrows the patterned stems and can take over the plant. Managing an Albo is an active job: maximum bright indirect light, and prune out all-green shoots to protect the pattern and all-white growth once it starts to fail. Slowest of the group, most light-hungry, least forgiving of wet feet — and the reason for every one of those is the same missing chlorophyll.
Beyond these, the collector forms (Aurea, with yellow variegation, and various mints) all obey the same single adjustment, turned up or down with the amount of non-green tissue: paler plant, brighter spot, slower expectations, drier hand.
Common Problems Preview: The Short Answers
Start with the symptom — then read the short answer below it:
| Symptom | Likely cause |
|---|---|
| No splits | Too young, or too little light |
| Yellow leaves | Overwatering (most common) |
| Brown, crispy edges | Salts or underwatering — dry air is a minor player |
| Small leaves | Low light, or the plant wants support |
| Leggy stems | Insufficient light |
| Drooping | A watering issue — check the soil first |
| Black stem spots | Stem rot from overwatering — act fast |
This is a care guide, so these are the honest short versions — the pattern to recognize and the first move — with the door to the full diagnosis where the site keeps it.
Leaves not splitting. The headline complaint, and by now you know the shape of the answer: the plant is reading its conditions as “forest floor.” Light first — a monstera in medium light may never mature its leaf program; age second — a young plant makes juvenile leaves no matter what; support third. Each new leaf is a fresh verdict, so improved conditions show up leaf by leaf, never retroactively. The full diagnosis, including how to tell a light problem from a young plant from a genuinely stuck one, is our guide to why your monstera is not splitting.
Yellow leaves. One oldest leaf yellowing slowly while the plant grows well is retirement — monsteras shed their earliest leaves their whole lives. Yellow spreading across several leaves, especially with soil that’s staying wet, is overwatering until proven otherwise: check how the roots are living before you do anything else. Yellow arriving with brown, crispy patches on a plant in hard sun is scorch instead. The color alone doesn’t diagnose it; the pattern plus the soil does.
Brown edges and tips. The far end of the leaf complains first about what’s been building up in the pot: fertilizer salts and hard-water minerals, concentrated by long dry spells between waterings. Flush the pot, review your feeding strength, and steady the rhythm. The same water-chemistry logic drives our spider plant brown tips fight — a different plant, an identical culprit — and the trimming verdict is shared too: browned tissue never re-greens, so trim within the brown and leave a hair-thin sliver of it rather than cutting into living tissue and starting a new brown edge.
Drooping. A monstera that wilts with dry soil is thirsty and will stand back up within hours of a thorough drink — that’s the easy version. The version to respect is drooping despite wet soil: roots in trouble can’t drink, however much water surrounds them, and adding more water to that plant is the one move guaranteed to make it worse. Check the base for firmness and the mix for sour smell before reaching for the watering can.
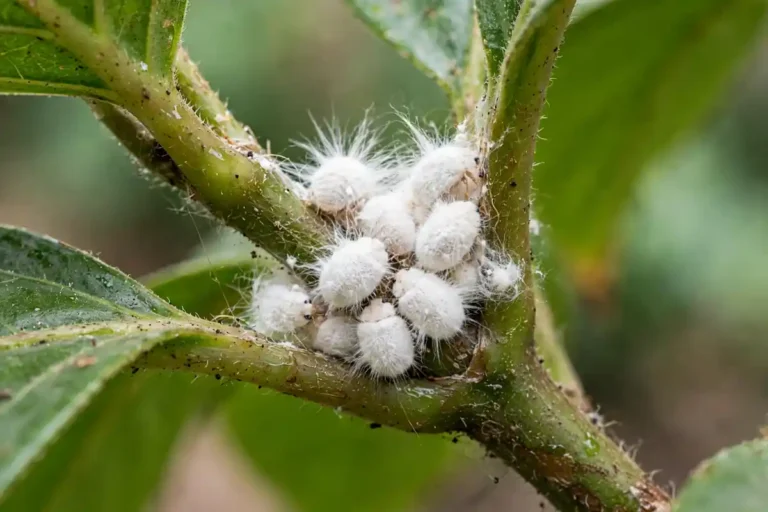
Pests. Three regulars. Mealybugs: white cottony tufts in the leaf joints and where stalk meets leaf — dab off with a rubbing-alcohol cotton swab, and repeat weekly until they stop appearing. Scale: immobile brown bumps along the stem and midribs — they look like part of the plant, which is the trick; scrape and swab. Thrips: the subtle one — silvery, stippled patches and distorted new leaves; wash the plant down hard in the shower and treat the undersides. And if tiny black flies rise from the soil when you water, those are fungus gnats — mostly harmless to a big plant, but they’re reliable witnesses that the mix is staying too wet; our fungus gnats guide has the full eviction. A monthly wipe-down of those big leaves is your inspection round: dust costs the plant light anyway, and you’ll meet every pest on this list while it’s still a nuisance instead of an infestation.
Pet Safety: Beautiful, and Not a Snack
Monstera leaves contain calcium oxalate crystals — tiny, needle-like crystals found throughout this plant family — and every part of the plant is an irritant if chewed. The honest calibration, because this gets exaggerated in both directions: a pet that bites a monstera leaf gets an immediate mouthful of burning irritation, and the usual sequel is drooling, pawing at the face, and sometimes vomiting — miserable, but in most cases self-limiting, and precisely why serious poisonings are rare. The plant defends itself on the first bite. It is not one of the genuinely dangerous houseplants; it is one to place with respect rather than panic.
Placement is the whole solution, and a monstera’s size makes it simple: it lives in a floor corner or up on a stand, elevated by its own architecture, where you can put the foliage beyond casual chewing height. Puppies in their chew-everything phase are the real risk class; a plant on a sturdy stand behind its own pot bulk defeats most of them. Pick up fallen leaves rather than leaving them at floor level, and keep cuttings in their jars on a counter, not the floor. If a pet does eat a real quantity and the drooling or vomiting doesn’t settle, call your vet and bring a leaf for identification.
Frequently Asked Questions
How often should I water a monstera? Whenever the top two inches of soil have dried — in a bright room in summer, roughly every week or so; in a dim room or in winter, every two to three weeks. Push a finger in or lift the pot and let the plant decide. The calendar version of this answer is how monsteras get drowned.
Why is my monstera not splitting? Almost always the conditions, read in order: not enough light (the most common cause — the leaf program stays juvenile in dim rooms), the plant is simply young, or it has nothing to climb. Remember each new leaf is a fresh verdict on recent weeks, so improvements appear leaf by leaf. The full diagnosis is in our not-splitting guide, linked in the problems section above.
Does a monstera need a moss pole? No — it needs one only if you want what a pole buys: bigger, more heavily split leaves and an upright, contained plant. An unclimbed monstera sprawls and stays smaller-leaved but can be perfectly healthy. If you do add a pole, put it at the back of the stem (the aerial-root side) and keep a moss pole damp, or the roots will ignore it.
How big will my monstera actually get? Plan on furniture scale: 6 to 8 feet tall indoors, several feet wide if it’s sprawling rather than climbing, with leaves up to about two feet across. In bright light it grows fast enough that you’ll see the difference season to season. It won’t flower or fruit indoors in any practical sense — buy it for the leaves and give it a corner it can grow into.
Can a monstera take direct sun? Yes, if it earns it gradually — and that’s the part most guides leave out. Leaves grown in shade scorch when moved suddenly into hard sun, but a plant stepped into stronger light over a week or two builds new leaves suited to it and handles direct morning sun happily. The overnight move from a dim corner to a blazing south window is the scorch story you’ve read about.
Is monstera toxic to cats and dogs? Yes — the leaves contain calcium oxalate crystals and are irritating if chewed, typically causing drooling, mouth discomfort, and sometimes vomiting. It’s rarely serious because the first bite is so unpleasant that pets stop. Place it out of chewing reach, especially for puppies, and call your vet if a real amount gets eaten and symptoms don’t settle.
Why is my new monstera leaf stuck or coming out damaged? Usually dry air at the wrong moment: a leaf emerging beside a heating vent, or in very dry winter air, can fail to slide free of its sheath and tear or crimp as it opens. Move the plant away from the vent; a warm, damp cloth held around the furled leaf for a few minutes softens the sheath and usually frees it. Misting doesn’t prevent it.
Can I propagate a monstera from a single leaf? No — and this one has no workaround. A leaf without a piece of stem carrying a node can root and live in water for a long time, but it will never grow a new stem or leaf. Every real cutting needs at least one node; a node with no leaf at all has a better future than a leaf with no node.
When should I repot my monstera? When the evidence says so: roots escaping the drainage holes or circling on the surface, the plant visibly heaving itself up, or water running straight through so it’s thirsty again in days. Move up just one size, ideally in spring — and use the occasion to install or upgrade its support, because a pole set into a fresh pot is the one that stays steady at six feet.
Why is my monstera dripping water from its leaf tips in the morning? Guttation — and it’s normal. When the soil is moist and the night air is still, the plant pushes excess water out through special pores at the leaf tips, and you find droplets there in the morning. It’s the plant’s pressure valve, not a leak and not a disease; just don’t let pets drink the droplets, and wipe up what lands on wood floors.
Monstera or pothos — which should I get? Pothos is easier and more forgiving; monstera is more dramatic but needs brighter light and much more space. Beginners who want a statement plant and have the corner for it: monstera. Beginners who want something unkillable on a shelf: pothos — our pothos care guide covers that plant in full.
Give a monstera the two things it left the forest floor looking for — real light, and something to climb — keep its mix chunky and its drinks deep and infrequent, and the rest of this guide becomes what it should be: reference material you rarely need. The plant will do the dramatic part itself, one bigger, stranger, more beautiful leaf at a time.
3 Comments