Mealybugs on Houseplants: Identification & Treatment
You know that sinking feeling when you lean in to admire your plant and spot it — a tiny white cottony blob tucked where the leaf meets the stem. You poke it. It doesn’t brush away like dust. You look closer and there are three more. Welcome to mealybugs on houseplants, the pest that looks like harmless fluff and behaves like a slow-motion plant assassin.
I’ve fought mealybugs more times than I care to admit, and here’s what I wish someone had told me at the start: these are not a “spray once and forget” pest. That cottony white coating isn’t just for show — it’s a waxy armor that repels most sprays, and underneath it the females are laying egg sacs containing up to 600 eggs each. Kill the visible adults and feel victorious, and two weeks later the crawlers hatch and you’re back to square one. But once you understand their life cycle and their hiding spots (including the one hiding spot almost every guide under-covers — the roots), mealybugs are entirely beatable with patience and the right routine.
This guide covers everything: what mealybugs are and why their waxy coating defeats casual spraying, how to identify them and the damage they cause, every hiding spot including root mealybugs (a full section, because your competitors’ guides barely mention them), a step-by-step 4–6 week treatment program, when systemic insecticides are appropriate, how to tell mealybugs apart from lookalike pests, and the quarantine routine that keeps them out for good.
In This Guide
- What mealybugs are: life cycle and why the waxy coating defeats sprays
- Identification: cottony clusters, honeydew, sooty mold, and the ant connection
- Where mealybugs hide (leaf axils, crevices, and roots)
- Root mealybugs: the hidden infestation most guides skip
- Step-by-step treatment: the 4–6 week elimination program
- Rubbing alcohol spot treatment technique
- Neem oil and insecticidal soap rotation
- Systemic insecticides: when they’re appropriate (with cautions)
- Prevention: the 2–3 week quarantine rule
- Mealybug vs. scale vs. aphids vs. spider mites comparison
- FAQs
What Mealybugs Are: Life Cycle and Waxy Armor
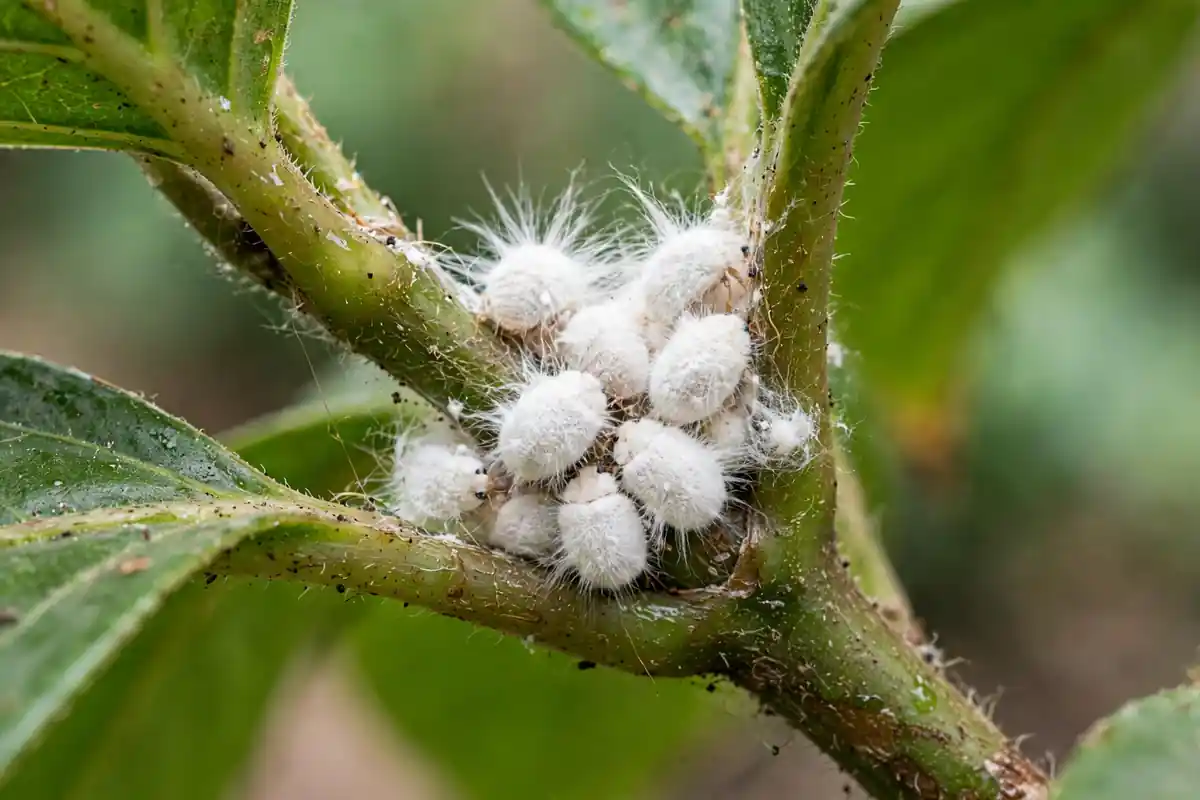
Mealybugs are small, soft-bodied insects (unlike spider mites, these are true insects) in the family Pseudococcidae. The most common indoor species are the citrus mealybug (Planococcus citri) and the longtailed mealybug (Pseudococcus longispinus), plus the Madeira mealybug on some ornamentals. Adult females are about 1/8 inch long, oval, wingless, and covered in a white, powdery wax — with short waxy filaments around the body margin and, on longtailed mealybugs, distinctive long tail filaments.
Here’s the life cycle that makes them so persistent:
- Eggs — Females lay 300–600 eggs inside a fluffy white cottony egg sac called an ovisac. These sacs are tucked into every crevice of the plant.
- Crawlers — The eggs hatch into tiny, mobile nymphs called crawlers. This is the most vulnerable stage — crawlers haven’t built up their full waxy armor yet, and they’re the stage most susceptible to sprays. Crawlers can also emerge over an extended period — up to 45 days after the adults are gone — which is why one treatment never works.
- Nymphs to adults — Crawlers settle, feed, and develop their waxy coating through several molts. Adult females are wingless and stay put; males are tiny winged gnats you’ll rarely notice.
The whole cycle takes 6–10 weeks indoors, but overlapping generations mean every life stage is present simultaneously on an infested plant. You’re never fighting just one generation — you’re fighting a continuous pipeline.
Why the waxy coating matters: that white powdery wax is hydrophobic — it literally repels water-based sprays. Spray a mealybug with plain water or a weak soap solution and the droplets bead up and roll off the wax without touching the insect underneath. This is why mealybugs survive treatments that would kill aphids or spider mites on contact. Effective treatment either dissolves the wax (rubbing alcohol), smothers through it (horticultural oil with thorough coverage), or bypasses it entirely (systemics taken up by the plant). Understanding this one fact explains every treatment recommendation in this guide.
Identification: Cottony Clusters, Honeydew, Sooty Mold, and Ants
Mealybugs are easier to identify than most houseplant pests because they barely try to hide:
- White cottony clusters — the signature sign. Look for what resembles tiny bits of cotton wool in leaf axils (where leaf meets stem), along stems, on leaf undersides, and at growing tips. Each “cotton ball” is either a mealybug or an egg sac.
- Sticky honeydew — mealybugs feed on plant sap and excrete a sugary liquid called honeydew. If your plant’s leaves (or the table underneath) feel sticky, sap-feeders are at work.
- Black sooty mold — a dark, powdery fungus that grows on honeydew. It doesn’t infect the plant directly, but it coats leaves in black film that blocks light. If you see sooty mold, you’ve had sap-feeding pests for a while.
- Ants — indoors this is less common, but ants farm mealybugs for their honeydew and will protect them from predators. Ants trailing to a houseplant is a red flag.
- Distorted, yellowing growth — new leaves emerge stunted, curled, or yellowed because mealybugs prefer feeding on tender new growth, draining it before it can develop properly.
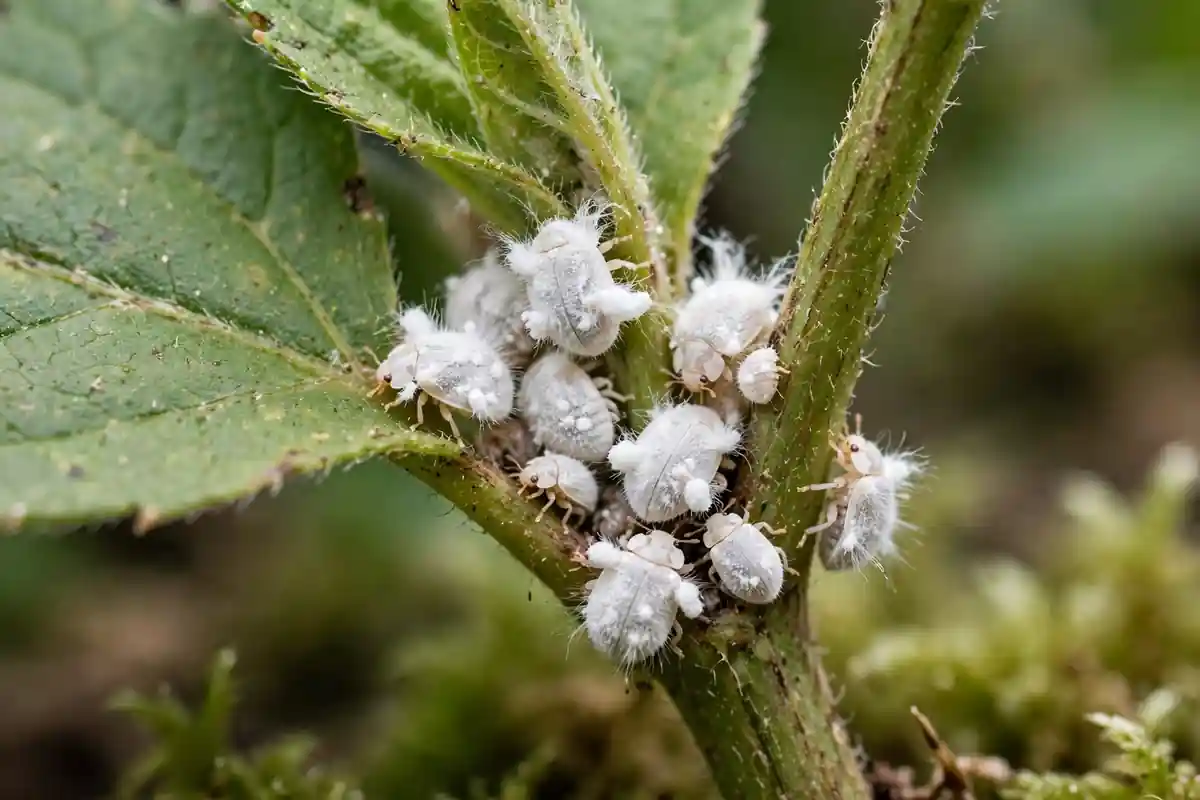
Don’t confuse mealybugs with woolly aphids (which are actual aphids with a woolly coating, rarer indoors) or with cottony cushion scale (a type of scale insect). True mealybugs are segmented and mobile — if you poke one with a toothpick, it will slowly walk away. Scale insects are immobile bumps. That mobility test is the quickest field ID.
Also check for the less obvious cousin: if the above-ground plant looks clean but the plant is mysteriously declining — stunted, wilting despite wet soil, yellowing — suspect root mealybugs (full section below). They’re the same pests, just living underground.
Where Mealybugs Hide: Know Every Spot or Lose
Mealybugs are crevice specialists. Before treating, learn their favorite hiding spots so your treatment actually reaches them:
- Leaf axils — the number one spot. That tight V where the leaf stem meets the main stem is the perfect sheltered nursery.
- Leaf undersides — especially along the midrib.
- Growing tips and new buds — tender tissue, easy feeding.
- Stem crevices and bark cracks — on woody plants like fiddle leaf figs.
- Under the pot rim and saucer — females lay eggs here, off the plant entirely.
- In the top layer of soil — egg sacs tucked just under the surface.
- On the roots — root mealybugs (see next section).
When you inspect, be systematic: start at the top of the plant and work down, checking every axil and leaf underside. Use your phone’s flashlight — the white wax reflects light and stands out in crevices. For the initial inspection, budget real time; a thorough check of a medium houseplant takes 10–15 minutes. Rushing the inspection is how infestations survive “treatment.”
Root Mealybugs: The Hidden Infestation Most Guides Skip
This is the section most mealybug guides under-cover, and it’s the reason some infestations seem immortal. Root mealybugs are the same insects (usually citrus mealybug) living on the roots underground, covered in white wax, feeding on root sap. You’ll never see them unless you unpot the plant — but they cause real damage: stunted growth, chronic wilting even when the soil is moist, yellowing, and general decline that looks like a watering or fertilizer problem.
Signs pointing to root mealybugs:
- The plant declines despite correct watering, light, and feeding
- You treated visible mealybugs repeatedly but they “keep coming back” (they’re re-colonizing from the roots)
- White, cottony masses visible on roots when you unpot, or a white waxy residue in the soil
- A fine white powder on the inside of the pot when you slide the plant out
- Ants interested in the pot (farming the honeydew producers underground)
Root mealybug treatment — step by step:
- Take the plant outside or to a contained area. Slide it out of the pot and discard all the old soil — don’t compost it, bag it and trash it. Egg sacs in the soil will restart everything.
- Rinse the entire root ball under a strong stream of water, washing away soil and as many mealybugs as possible. Be thorough but gentle with the roots.
- Inspect the roots. Prune away any dead, mushy roots with sterilized scissors (dark, soft roots are dead; white/tan firm roots are alive).
- Soak the roots for 15–20 minutes in a bucket of lukewarm water with insecticidal soap (1 tablespoon castile soap per quart) or a neem drench. This reaches mealybugs hiding in root crevices.
- Scrub the empty pot with hot soapy water, or better, use a fresh pot. Mealywax and eggs cling to pot walls and rims.
- Repot in fresh, sterile potting mix. Do not reuse any of the old soil.
- Water in with a neem soil drench (1 teaspoon neem + 1/2 teaspoon soap per quart of water) to catch anything the soak missed.
- Keep the plant isolated and check the soil surface weekly for 6 weeks — white waxy residue reappearing means a second treatment is needed.
Root mealybugs are also why you should never reuse potting soil from an infested plant, and why inspecting roots is worth doing when you buy a new plant that looks “off” despite a clean canopy.
The 4–6 Week Elimination Program: Step by Step
Here’s the complete treatment protocol. Mealybugs demand persistence — the ovisacs protect eggs for weeks, and crawlers keep emerging long after adults die. This program is designed to outlast them.
Step 1: Isolate Immediately
Move the infested plant away from all others. Mealybug crawlers are mobile and will walk to neighboring plants; adults hitchhike on your hands and tools. Inspect every nearby plant thoroughly — treat the whole cluster if you find spread. Work on the infested plant last during your plant-care routine, and wash your hands and tools afterward.
Step 2: Prune the Worst Infestations
If a stem or leaf is heavily coated — dozens of mealybugs in a solid cottony mass — cut it off. Seal prunings in a bag and trash them (don’t compost). Pruning does three things: instantly removes a huge portion of the population including egg sacs, opens up the plant so sprays can reach remaining crevices, and removes the most damaged tissue that won’t recover anyway. Sterilize your pruners with rubbing alcohol between cuts.
Step 3: Alcohol Swab Every Visible Mealybug
Dip a cotton swab in 70% isopropyl rubbing alcohol and dab each mealybug directly. The alcohol dissolves the waxy coating on contact and kills the insect within seconds — you’ll see the white fluff collapse and the yellowish body underneath. This is the most satisfying step and the most effective for light infestations.
Technique matters: press the swab firmly into each axil and crevice, rotating to expose fresh cotton. Use a new swab as they get gunked up. For tight clusters, a soft toothbrush dipped in alcohol works better than swabs. Check the undersides of every leaf.
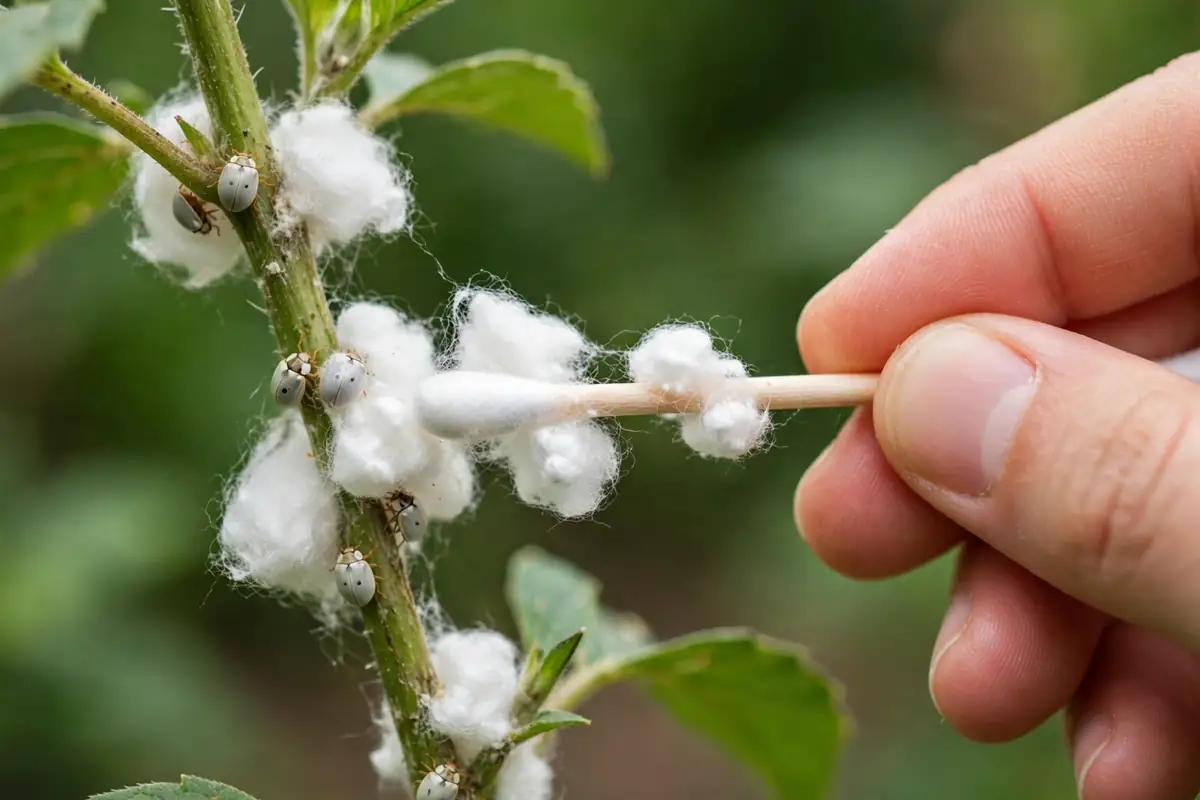
Alcohol cautions: 70% isopropyl is the sweet spot — strong enough to dissolve wax, with enough water content to avoid instant evaporation. Test on one leaf first and wait 24 hours; some plants with delicate or hairy leaves (African violets, some ferns) can be damaged. Never spray alcohol broadly — swab precisely. And keep alcohol away from open flames, obviously.
Step 4: Spray Thoroughly (Neem or Insecticidal Soap)
After swabbing, drench the entire plant with neem oil spray or insecticidal soap (recipes below). Coat every surface — this kills the crawlers too small to see and reaches mealybugs you missed with the swab. Pay special attention to axils, growing tips, and stem joints. Spray in the evening, out of direct sun.
Step 5: Repeat Every 5–7 Days for 4–6 Weeks
This is non-negotiable. Each treatment kills the current vulnerable population, but eggs in ovisacs keep hatching for weeks. The repeat cycle catches each new wave of crawlers before they mature and lay their own eggs. Alternate between alcohol swabbing (for visible adults) and full sprays (for crawlers) — swab on day 1, spray on day 5–7, inspect and swab again, spray again. Mark it on your calendar.
Step 6: Inspect Soil and Pot Rims
At each treatment session, check the pot rim, saucer, and soil surface for white waxy residue or egg sacs. Wipe rims with alcohol. If you see soil-surface activity, do a neem soil drench (recipe below) to target root-zone mealybugs before they become a full root infestation.
| Week | Action | Target |
|---|---|---|
| 1 | Isolate, prune, alcohol-swab all visible, full spray | Adults + visible egg sacs |
| 2 | Inspect, swab survivors, full spray | Hatchlings from week 1 |
| 3 | Inspect, swab, full spray (rotate product) | Second crawler wave |
| 4 | Inspect, spot-swab, full spray | Late hatchers |
| 5–6 | Inspect twice weekly, spot-treat only | Stragglers; confirm clearance |
Neem Oil and Insecticidal Soap: Recipes and Rotation
Neem oil spray recipe (same base that works for spider mites and most soft-bodied pests):
- 1 quart warm water
- 1–2 teaspoons cold-pressed neem oil
- 1/2 teaspoon pure castile soap (emulsifier)
Mix soap into water first, add neem, shake hard, use within 8 hours. Drench the plant completely — neem’s azadirachtin disrupts mealybug feeding and reproduction, and the oil helps smother crawlers. The soap in the mix also helps cut through waxy coatings on the nymphs.
Insecticidal soap spray recipe:
- 1 quart water
- 1 tablespoon pure castile soap
Spray thoroughly, wait 1–2 hours, then rinse with plain water to prevent leaf damage. Soap kills crawlers and nymphs on contact by breaking down their cell membranes — it’s less effective on wax-armored adults, which is why you swab the adults with alcohol first and use soap for the small stuff.
Neem soil drench (for root-zone mealybugs and soil-surface egg sacs):
- 1 quart water
- 1 teaspoon cold-pressed neem oil
- 1/2 teaspoon castile soap
Water it through the soil until it drains from the bottom. The azadirachtin is taken up by the roots and makes the plant tissue unpalatable from the inside — this is particularly useful against root mealybugs and the crawlers sheltering in the top soil layer.
Rotate your products. Just like with spider mites, rotating between alcohol (wax-dissolver), soap (contact killer), and neem (growth disruptor) prevents the population from adapting and hits every life stage through different mechanisms. Never rely on a single product for the whole 6-week program.
A note on horticultural oil: dormant-rate horticultural oil sprays are very effective against mealybugs because oil smothers through the wax — but they’re easy to over-apply indoors and can damage some plants. If you go this route, use a lightweight summer oil at the label’s indoor rate, spot-test first, and keep the plant out of sun for 24 hours. Mississippi State University Extension’s houseplant pest guidance notes that thorough-coverage oil sprays control mealybugs but typically need repeating — their extension materials on houseplant insect pests are worth a read for the underlying principles.
Systemic Insecticides: When They’re Appropriate (With Cautions)
Sometimes — a large plant with mealybugs deep in every crevice, a treasured specimen where manual treatment isn’t feasible, or a root mealybug infestation that survived the unpotting protocol — a systemic insecticide is the pragmatic choice. Systemics (most commonly imidacloprid for houseplants) are absorbed by the roots and distributed through the plant’s sap. When mealybugs feed, they ingest the insecticide. The wax armor becomes irrelevant because the poison comes from inside the plant.
When systemics make sense:
- Large plants where thorough spray coverage is physically impossible
- Recurring infestations that survived 6+ weeks of contact treatment (likely root mealybugs)
- Valuable or irreplaceable plants where you need certainty
- Multiple infested plants (a soil drench treats the whole collection efficiently)
The cautions (read these before buying):
- Slow acting. Imidacloprid takes 2–6 weeks to distribute through the plant. It’s not a quick fix — start it alongside contact treatment, not instead of it.
- Indoor safety. Use only products explicitly labeled for indoor houseplants, follow the label exactly, keep away from children and pets, and don’t use on herbs or anything edible.
- Pollinator concern. Systemic neonicotinoids persist in plant tissues including pollen. Never use on plants that will go outdoors to flower, and never on outdoor flowering plants.
- Resistance. Like all single-chemistry approaches, overuse breeds resistance. Use systemics as the heavy artillery for tough cases, not the default for every cottony blob.
- Doesn’t replace inspection. Even with a systemic working, keep up the visual checks — no treatment is 100%, and early detection of survivors matters.
Application is usually granules scratched into the soil surface or a soil drench, watered in. One application typically protects for 6–12 weeks — long enough to outlast the egg-hatch cycle completely. For most home growers, though, the alcohol + neem + soap program handles everything without chemistry. Reserve systemics for the battles you’re losing.
Damage: Honeydew, Sooty Mold, and Decline
Mealybug damage goes beyond the ugly white fluff. Understanding the damage cascade helps you assess how bad things are and what recovery looks like:
Sap depletion. Every mealybug is a tiny sap tap. Heavy feeding drains the plant’s energy reserves — growth stalls, new leaves emerge small and distorted, and the plant loses vigor. A plant that’s been fed on for months may take a full growing season to recover even after the pests are gone.
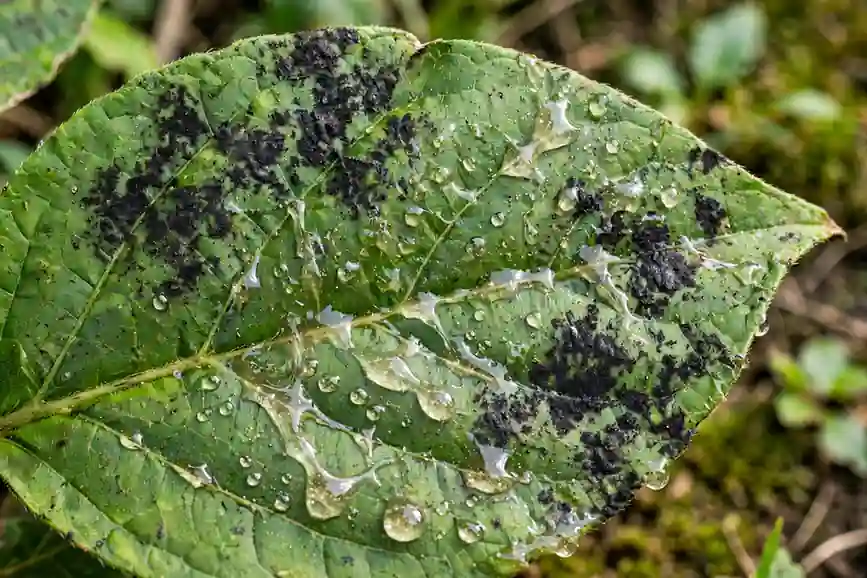
Honeydew and sooty mold. The sugary honeydew coats leaves and everything below the plant. Then sooty mold — a black fungus — colonizes the honeydew, covering leaves in dark film. Sooty mold doesn’t infect the plant, but it blocks light and looks terrible. After eliminating the mealybugs, wipe sooty mold off with a damp cloth; it doesn’t wash off in the shower easily because it’s slightly greasy. The mold dies once the honeydew supply stops, but the black coating remains until you clean it.
Virus transmission. Mealybugs can transmit plant viruses between plants — another reason isolation matters. A virus-infected plant can’t be cured, only discarded, so preventing mealybug movement between plants protects against more than just the bugs.
Secondary decline. Weakened plants become susceptible to everything else — fungal issues in the damaged tissue, white mold on the soil surface from the excess moisture of honeydew, and general failure to thrive. If your mealybug-infested plant also develops fungus gnats, treat the mealybugs first (the primary problem) while letting the soil surface dry to discourage the gnats.
Recovery expectations: once mealybugs are eliminated, expect 2–4 weeks before new growth looks normal. Prune the most damaged leaves — they won’t recover, and removing them lets the plant redirect energy to new growth. Resume normal (not heavy) fertilizing once clean new growth appears.
Prevention: The 2–3 Week Quarantine Rule
Mealybugs almost always arrive on new plants. The nursery plant looked clean because the infestation was in the crawler stage — invisible to the naked eye — or hiding as egg sacs in the soil. Two weeks later, the cotton appears. Here’s the prevention system:
Quarantine every new plant for 2–3 weeks. Separate room, no leaf contact with your collection. During quarantine, inspect twice: once on arrival (axils, undersides, soil surface, pot rim) and once more at day 10–14 (catches anything that hatched since arrival). Only graduate the plant to the main collection after two clean inspections.
Inspect during routine care. Make it habit: every time you water, flip two or three leaves and glance at the axils. Mealybugs caught at the “three cottony blobs” stage take five minutes with an alcohol swab. The same infestation at “every axil on the plant” takes six weeks of warfare. Early detection is the entire difference.
Don’t over-fertilize. Soft, nitrogen-pushed growth is mealybug candy. Feed moderately, especially in winter when plants aren’t actively growing.
Clean tools and pots. Sterilize pruners with alcohol between plants when you’ve been working on an infested one. Don’t reuse soil or unwashed pots from infested plants.
Control ants (for those with indoor ant issues) — ants protect mealybugs from predators and move crawlers to new plants. No ants, no bodyguards.
Check the “high-risk” newcomers. Plants most likely to arrive with mealybugs: hoyas (every crevice), jade plants and succulents (axils), orchids (sheaths and roots), citrus and ficus (all over). Give these extra scrutiny during quarantine.
Mealybugs vs. Lookalikes: The Comparison Table
Misidentification wastes weeks of wrong treatment. Here’s how to tell mealybugs from the other common houseplant pests:
| Feature | Mealybugs | Scale insects | Aphids | Spider mites |
|---|---|---|---|---|
| Appearance | White cottony clusters, segmented bodies | Immobile brown/tan bumps on stems and leaves | Small soft pear-shaped bugs, often green/black, clustered on new growth | Tiny dots, nearly invisible; fine webbing |
| Moves? | Slowly (poke one — it walks) | No (adults fixed in place) | Yes, slowly | Yes |
| Honeydew? | Yes | Soft scale: yes. Armored scale: no | Yes | No |
| Sooty mold? | Yes | Soft scale: yes | Yes | No |
| Waxy armor? | Yes — powdery wax | Yes — hard shell | No | No (mites, not insects) |
| Best first treatment | Alcohol swab + neem/soap rotation | Scrape off + horticultural oil | Strong water spray + soap | Water blast + soap/neem rotation |
| Root form? | Yes — root mealybugs | Rarely indoors | No | No |
The key distinctions: cottony + mobile = mealybugs. Bumps that don’t move = scale. Clusters on new growth that aren’t cottony = aphids. Stippled leaves + webbing, no visible bugs = spider mites. When in doubt, the poke test (mobile vs. immobile) and the cotton test (fluffy vs. hard bump) resolve 90% of confusion. My scale treatment guide covers the immobile-bump pests in detail if that’s what you’ve got.
Frequently Asked Questions
Adult mealybugs look like tiny white cottony ovals, about 1/8 inch long, usually clustered where leaves meet stems, on leaf undersides, or at growing tips. The “cotton” is a waxy coating; underneath is a soft, segmented, yellowish-pink insect. Egg sacs look like larger fluffy white masses. If you poke one with a toothpick and it slowly walks away, it’s a mealybug — that mobility distinguishes them from immobile scale insects.
A light infestation won’t kill a healthy plant quickly, but heavy or prolonged infestations absolutely can — they drain sap continuously, stunt all new growth, and the resulting sooty mold blocks photosynthesis. Small or already-stressed plants are most at risk. The real danger is time: mealybugs reproduce steadily, so ‘just a few’ becomes ‘every axil’ within a couple of months. Treat early and the plant recovers fully; ignore them and you may lose it.
Crawlers (newly hatched nymphs) walk to adjacent plants across touching leaves, and they hitchhike on your hands, clothing, and tools while you tend your collection. Egg sacs can also hide in soil, pot rims, and saucers. They don’t fly. Isolation of infested plants, spacing between pots, and washing hands and tools after handling an infested plant stops most spread. Always work on infested plants last in your routine.
Yes — it’s one of the most effective contact treatments. 70% isopropyl alcohol dissolves the waxy coating that protects mealybugs, killing them within seconds of contact. Dab each bug with an alcohol-soaked cotton swab, pressing into crevices. It doesn’t kill eggs reliably and evaporates too fast for broad spraying, so use it as the precision tool for visible adults alongside sprays (neem, insecticidal soap) for the crawlers you can’t see. Spot-test delicate plants first.
Plan on 4–6 weeks of active treatment: weekly inspections with alcohol swabbing of survivors plus full neem or soap sprays every 5–7 days. The timeline is dictated by the egg cycle — ovisacs protect eggs for weeks, and crawlers can emerge up to 45 days after adults are gone. Stopping at week two because ‘they look gone’ is the classic mistake. If root mealybugs are involved, add the unpotting and soil-replacement protocol, which resets the clock but solves the hidden reservoir.
Yes — root mealybugs feed on roots underground, and even above-ground species tuck egg sacs into the top layer of soil and under pot rims. If visible mealybugs keep reappearing after thorough foliar treatment, unpot the plant and inspect the roots for white cottony masses. Treatment means discarding all old soil, rinsing roots, soaking in insecticidal soap, and repotting in fresh sterile mix — plus scrubbing or replacing the pot. Never reuse soil from an infested plant.
No. Mealybugs feed only on plant sap and can’t bite people or animals. The honeydew they produce is just sugar water (though it grows unsightly sooty mold). The main risk is to your plants, not your household. That said, keep rubbing alcohol treatments away from curious pets, and if you use a systemic insecticide, follow the label’s safety directions carefully and keep treated plants away from children and pets.
Four usual reasons: you stopped treating too soon (eggs kept hatching — the 4–6 week program exists for this), you missed a reservoir (root mealybugs, egg sacs under the pot rim or in the soil), a neighboring plant is re-infesting the treated one (inspect and isolate the whole cluster), or you’re only killing adults while crawlers mature untouched (rotate in full-coverage sprays, not just swabbing). Persistent comebacks almost always mean a hidden reservoir — unpot and check the roots.
Consider it when contact treatments have failed after 6+ weeks, for large plants where thorough spray coverage is impossible, or for confirmed root mealybugs that survived the unpotting protocol. Imidacloprid soil drenches (labeled for indoor houseplants) work from inside the plant, bypassing the waxy armor entirely — but they’re slow (2–6 weeks to take effect), must be kept away from pollinators and edibles, and should be a last resort rather than the default. Most home infestations resolve with the alcohol + neem + soap program.
Quarantine every new plant in a separate room for 2–3 weeks before it joins your collection. Inspect leaf axils, leaf undersides, growing tips, the soil surface, and the pot rim with a flashlight on arrival and again at day 10–14. Pay extra attention to hoyas, jade plants, orchids, and citrus — frequent mealybug carriers. Catching a hitchhiking infestation during quarantine takes minutes; catching it after it’s spread through your collection takes months.