
Spider Plant Care Guide: Light, Water, Babies & Leaves That Stay Green
If I had to hand a first houseplant to someone who swears they kill everything, I’d hand them a spider plant — and I say that as someone who has watched this plant forgive things that would finish off almost anything else on the windowsill. Spider plants (Chlorophytum comosum) grow fast, shrug off a missed watering, adapt to whatever light a normal room offers, and then, once they’re settled, start producing baby plants by the dozen and giving them away for free. It is the most generous houseplant I know.
There’s exactly one honest caveat, and this whole guide hangs on it: a spider plant forgives neglect far better than it forgives kindness. The two ways people actually lose this plant are drowning its roots in a pot that never dries, and slowly crisping its leaf tips with the minerals in their tap water. Neither is hard to avoid once you understand what’s happening — and both are covered properly below, along with the light it actually wants, the babies it keeps making, and why it’s one of the few houseplants you can recommend to a cat owner with a straight face.
One piece of housekeeping first, because it comes up constantly: yes, the spider plant was one of the plants in NASA’s famous clean-air study — in a sealed test chamber. In a real living room you’d need something approaching a jungle to measurably scrub the air, so grow this plant for its fountain of striped leaves and its endless free babies, not as an appliance. Clemson Extension’s roundup of houseplants for beginners keeps it in exactly the right company: plants recommended because they’re genuinely easy, not because of a headline.
Quick-Start Summary: The Essentials at a Glance
| Need | What to do |
|---|---|
| Light | Bright indirect for the best growth and boldest stripes; tolerates medium light, just slower and plainer |
| Water | When the top 1–2 inches of soil have dried — then soak thoroughly and drain fully |
| Soil | Standard well-draining potting mix with extra perlite; pot must have drainage holes |
| Feeding | Half-strength balanced fertilizer, monthly in spring and summer at most; none in winter |
| Temperature | 65–80°F is home; keep above about 50°F and away from cold glass and vents |
| Humidity | Ordinary room air is fine — it appreciates a bit more, but it doesn’t demand it |
| Growth habit | A fountain of leaves 1–2 feet across, with long stems of babies that trail 2 feet or more |
| Pets | Non-toxic to cats and dogs — one of the genuinely pet-safe houseplants |
Keep that table and you can keep a spider plant for years. Everything below is the why, the how, and the fixes.
Light: Bright Indirect, Translated Into Rooms
“Bright indirect light” is the most repeated and least explained phrase in houseplant care, so here it is in furniture terms. For a spider plant, bright indirect means an east-facing windowsill, a spot a few feet back from a south or west window, or right up against a bright window softened by a sheer curtain: the room is properly lit all day, but the sun’s rays aren’t parked on the leaves for hours. An hour or two of gentle morning sun is not just tolerated, it’s welcome — plants that get a little of it grow noticeably tighter and more colorful. Hard midday or afternoon sun straight through glass is the thing to avoid: it scorches pale, papery patches into the leaves, and a scorch mark never heals.
This is where spider plants earn their reputation, though: they tolerate. A spider plant in a medium-light room — several feet from the window, bright enough to read in by day — will grow perfectly respectable, just more slowly. Even a genuinely dim corner won’t kill it. What low light costs you is paid in three currencies. Growth slows to a crawl. The babies stop coming, because flowering stems are a luxury a light-starved plant doesn’t fund. And on the striped varieties, the pattern fades — which brings up the one piece of light biology almost nobody explains.
How variegation is lost. The white parts of a spider plant leaf contain no chlorophyll, so they do no work; the green parts feed the whole leaf, stripes included. In low light the plant runs a tighter budget, and new leaves come in with narrower stripes and more green — the plant is quite literally building cheaper leaves it can afford. Here’s the part that matters: a leaf that has already grown stays the way it grew. Existing striped leaves don’t fade to green, and plain reverted leaves don’t re-stripe when you move the plant brighter. What improves is the new growth. And if a whole shoot comes in solid green, that shoot has reverted — it will stay green and, being all chlorophyll, it will outgrow its striped siblings and gradually swamp them. The fix is light first, then pruning: cut fully reverted shoots out at the base so the plant’s energy goes to the patterned growth.
The practical rule: give it the brightest spot you have that isn’t a midday sunbeam, and if it has to live somewhere dimmer, choose the solid green form (more on varieties below) and expect a slower, quieter plant. If you want a plant that genuinely shrugs at the dark corner and asks for almost nothing, that’s a different plant’s job — our snake plant care guide covers that specialist.
Watering: Steady, Never Soggy
A spider plant’s ideal is soil that stays steadily, lightly moist through the spring and summer growth season — not wet, not bone dry, and never swinging wildly between the two. The working rule is simple: water when the top inch or two of soil has dried out, then water properly — soak the mix until it runs from the drainage holes, let it drain completely, and empty the saucer. In most homes that’s roughly every week or so in summer and noticeably less in winter, but let the soil make the call, not the calendar: a plant in a bright warm room and a plant in a cool dim one live on different schedules.
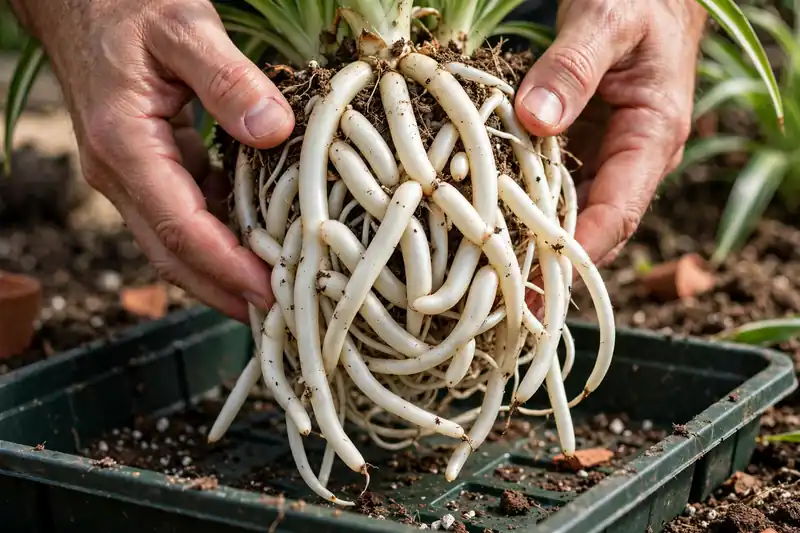
Why this plant forgives a missed watering. Upend a spider plant at repotting time and you’ll find the secret: thick, white, knobbly tuberous roots, like a cluster of pale fingers. Those roots are water tanks. They’re why a spider plant can go an extra week — two, in a pinch — past its watering day and simply look a bit thirsty rather than dying on you. Pale, washed-out, drooping leaves after a dry spell are the visible symptom, and they’re mostly reversible: water thoroughly and the plant usually perks back up within a day or so.
Why it doesn’t forgive the opposite. Those same storage roots rot fast in soil that stays saturated. A plant kept permanently wet — watered on a schedule whether the soil needs it or not, or standing in a saucer of runoff inside a decorative pot — will yellow, soften at the base, and decline in a way that looks confusingly like thirst. It isn’t thirst. It’s roots drowning. If the soil is wet and the plant looks wilted, the answer is never more water; it’s air and time. Keep the plant in its nursery pot inside the pretty cachepot if you like the look, lift it out to water, and never let it sit in its own runoff.
Two smaller habits make an outsized difference. First, water the soil, not the crown: pour around the base rather than into the center rosette, where standing water can sit in the leaf joints. Second, consistency beats quantity: the leaf-tip trouble in the problems section below is strongly linked to boom-and-bust watering — long droughts that concentrate salts in the soil, followed by floods. A steady rhythm, neither desert nor swamp, is what keeps those striped leaves clean to their very ends. In winter, when growth nearly stops, stretch the interval and let the top couple of inches dry; the plant is resting, not drinking.
Soil & Potting: Drainage Is the Whole Game
Spider plants are not fussy about soil brands; they’re fussy about one property — water has to move through it. A standard houseplant potting mix with a generous handful of perlite stirred through is genuinely all this plant asks: light, airy, and free-draining, holding moisture for days rather than either minutes or weeks. Dense, heavy mix straight from a bargain bag compacts around those tuberous roots and holds the wet that rots them, so if your mix feels like garden soil, the perlite is not optional decoration.
The pot rules are shorter than the soil rules. Drainage holes: non-negotiable. A spider plant in a sealed pot is a spider plant sitting in a swamp of its own runoff. Size: snugger than you think. Go up only an inch or two when you repot. A small plant in a big pot is surrounded by a sea of wet mix its roots can’t reach, and that mix sours. There’s also a charming side effect to a snug pot: spider plants produce noticeably more babies when they’re slightly rootbound, as if a full pot tells the plant it’s mature and settled enough to reproduce. Don’t weaponize that — a plant that’s severely rootbound, roots pushing it up out of the pot, needs room — but don’t rush to upsize a happy plant either.
When is a repot actually due? On evidence, typically every year or two for a fast grower: thick white roots poking from the drainage holes or circling the surface, the whole plant visibly lifting as the root mass expands, or water running straight through a root-packed pot so the plant is thirsty again in two days. Spring is the kindest time. Slide the plant out and you’ll meet those tuberous roots in person — fat, white, and faintly alarming if you weren’t expecting them. They’re healthy. What isn’t healthy is roots that are brown, grey, or mushy, or a sour smell from the mix; that’s the rot picture from the problems section, and it means trim to firm white tissue and repot into fresh mix. Otherwise: tease the roots gently, set the plant at the same depth in the new pot, firm the mix, water once to settle it, and let it be.
Feeding: A Light Hand, On Purpose
Spider plants are moderate feeders with one important sensitivity: they show overfeeding on their leaf tips, in brown. Fertilizer is salt, and salts accumulate in a pot — every feed adds a little, and the plant’s leaf tips, the far end of its plumbing, are where the excess announces itself. So the routine is deliberately modest: a balanced liquid houseplant fertilizer at half the label strength, once a month in spring and summer, and nothing from fall through winter, when the plant isn’t growing and can’t spend what you give it.
If your plant is growing steadily, holding its color, and producing babies, it is not hungry, whatever the fertilizer aisle says. The genuine hunger picture is pale, slow, small new growth on a plant that hasn’t been fed in a year or more — and even then, one light feed is the prescription, not a program. Two more rules that prevent most feeding trouble: never feed a stressed, wilting, or freshly repotted plant (fertilizer on unhappy roots is salt on a wound), and flush the pot once or twice a year — run plain water through slowly, several pot-volumes’ worth, draining freely — to wash out the accumulated salt bank before the leaf tips have to tell you about it.
Humidity & Temperature: Appreciated, Not Demanded
Here’s the honest calibration on humidity, because spider plants sit in an interesting middle. They descend from the forest floors and rocky banks of southern Africa, and they genuinely appreciate moderate humidity more than the desert houseplants do — a spider plant in a bright, steamy bathroom is often visibly the happiest one in the house, with cleaner leaf tips to show for it. Grouping plants together, which raises the humidity in their shared little pocket of air, suits them too.
But appreciates is not demands. A spider plant grows perfectly well in the ordinary air of a heated or air-conditioned home, and I have never seen one fail because its owner didn’t buy a humidifier. If yours lives in truly dry winter air next to a blasting vent, the vent is the first problem to fix — move the plant a few feet — and the dry air is the second. Treat humidity as a small bonus you can offer, not a requirement you’re failing.
Temperature is equally undramatic. The comfort zone overlaps yours almost exactly: 65–80°F is home. The plant sulks as you approach 50°F and takes real damage below it — leaves against freezing glass on a winter night are the classic case — so keep it off cold windowsills in hard weather and out of both heating vents and air-conditioning blasts. Warm room, no drafts, no extremes: that’s the whole section, and any guide that stretches it further is padding.
Propagation: The Babies Are the Whole Point
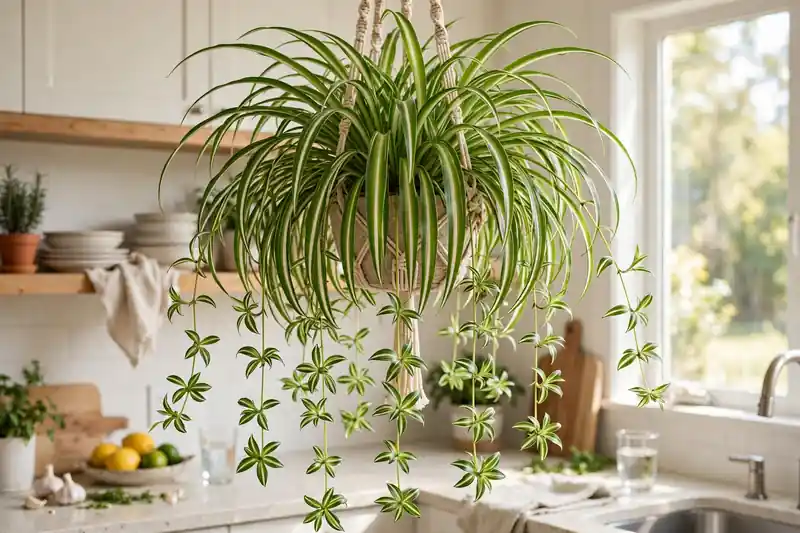
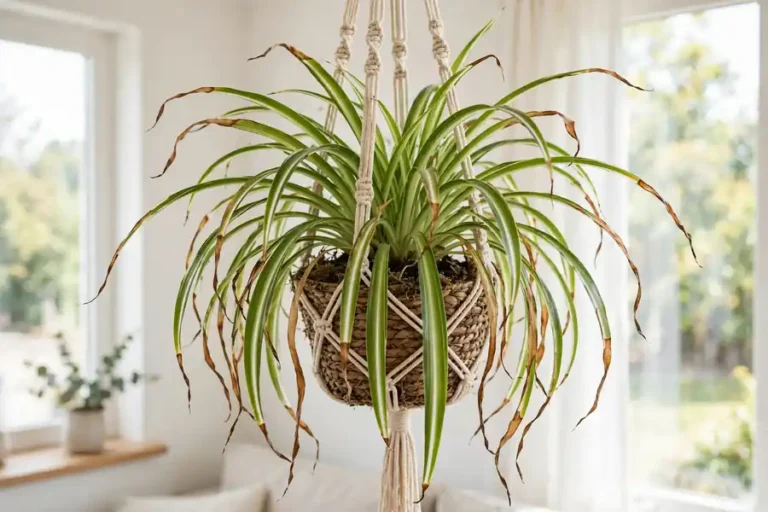
Somewhere in its second year, a settled spider plant does the thing that made it famous. Long, wiry stems arc out from the center of the plant, open small white star-shaped flowers, and then — at the joints along those stems — produce miniature spider plants: tiny rosettes with their own little leaves and, if you look closely, knobbly root nubs already forming in the air. Growers call them spiderettes, plantlets, pups, or just “the babies,” and a happy plant in a hanging basket can carry dozens, cascading down like a green waterfall.
What triggers them. Babies are a mature plant’s project. The recipe is a plant that’s at least a year or two old, bright light, a snug pot, and — the ingredient nobody mentions — the shortening days of late summer and fall, which nudge the plant to flower. A young plant in a dim room and a huge pot is not broken; it’s just missing every item on that list. Give it light and time.
When a baby is ready. Wait until a plantlet is roughly two inches across with several leaves and visible root nubs — little pale bumps or short roots at its base. Bigger and rootier is always easier. A plantlet that small still has the mother feeding it; that head start is the entire secret of the first method.
Method 1: Pin it down while it’s still attached (most reliable)
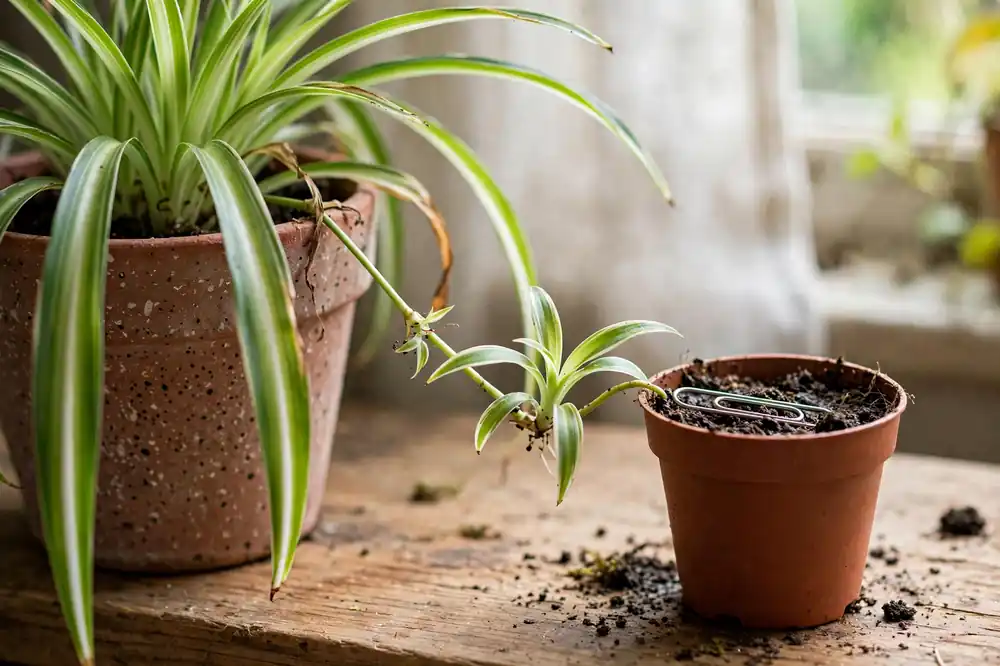
Set a small pot of moist mix next to the mother plant — or beneath her, if she hangs — and rest the baby on the soil surface, still attached to its stem. Pin it gently in contact with the mix using a bent paperclip or a hairpin over the stem, water the little pot, and keep it lightly moist. Roots grow down into the soil over the next two to three weeks while the mother plant keeps feeding the baby the whole time. Once it resists a gentle tug, cut the connecting stem. This is as close to a guaranteed success as propagation gets, because the baby never has to survive on its own until it already has roots in soil.
Method 2: Cut it and root it in water (most fun)
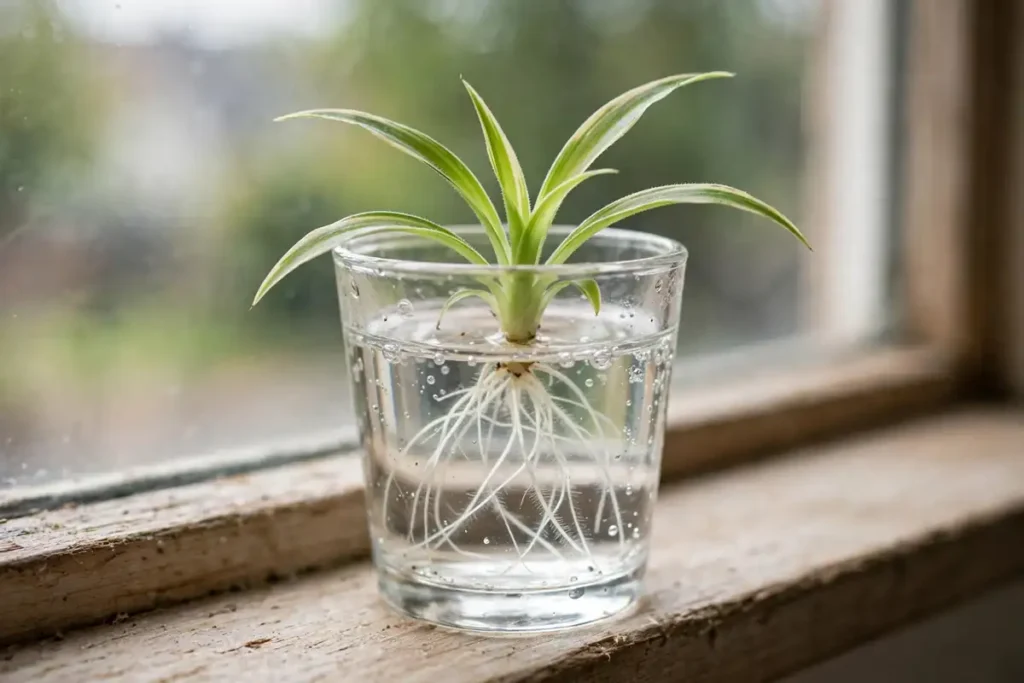
Snip the baby off its stem and set it in a small jar of water so only the base and root nubs are submerged — leaves held above the waterline. On a bright sill, roots typically appear within one to two weeks. Pot it up when the roots are an inch or two long, into the same well-draining mix, and keep the soil lightly moist for the first few weeks while water roots learn soil life. Change the jar water every few days so it stays fresh. This is the method kids (and, let’s be honest, adults) love, because you get to watch.
Method 3: Cut it and plant it straight into soil (fastest hands-off)
If a baby already carries decent root nubs, you can skip both rituals: snip it, press it into a small pot of moist mix so the nubs are buried and the rosette sits on the surface, firm it gently, and keep the mix evenly moist — not wet — for two to three weeks in bright indirect light. It roots in place and there’s no transplant step later. Water-rooting and soil-rooting both work; soil is less fuss, water is more show.
And the fourth option: don’t
Nothing says you have to harvest them. A mother plant left wearing her babies is the classic spider plant look — the whole reason people hang them in baskets. Leave the cascade as long as you like. The honest trade-off is small: a plant carrying dozens of plantlets spends some energy on them, and an annual tidy — removing a few of the oldest, brownest stems — keeps her looking deliberate rather than overgrown. When you do pot babies up, plant three to five together in one pot for an instantly full new plant, and know that a well-grown baby can be producing babies of its own within a year or so.
Dividing a crowded mother. A mature spider plant eventually becomes a dense mass of tuberous roots with babies everywhere, and division both rejuvenates her and gives you free plants:
- Water the plant a day before (it reduces the stress of the operation).
- Slide it out of the pot and shake off the loose soil.
- Pull or cut the root ball into 2–4 sections, each with leaves and roots. The thick white tubers are water storage — don’t panic, they’re supposed to look like that.
- Pot each division in fresh mix at the same depth as before.
- Water lightly and keep in bright indirect light for 2 weeks.
Spring is ideal, and a divided spider plant often answers with a flush of new growth — and babies — within a season. One rule covers all of the propagation above: don’t strip babies from a stressed mother plant, and don’t divide one either — let her recover first.
Display, briefly: hanging baskets show off the cascading babies best, and a high shelf works too. In a regular pot on a table, rotate it weekly so the growth stays even.
Pruning & Grooming: Five Minutes, Occasionally
A spider plant needs very little from your scissors, but the little it needs, it needs done right.
Trimming brown tips — the sliver rule. Dead brown tissue never turns green again, so trim it — but trim it inside the brown. Cut with clean scissors following the leaf’s natural taper, and deliberately leave a hair-thin sliver of the brown behind. The reason is mechanical: if you cut into living green tissue, you’ve wounded it, and that wound edge browns in its turn, so the tip creeps backward a fraction with every trim until the leaf looks chewed. A sliver of old brown left in place is a finished edge; the leaf keeps it without complaint. (And fix the cause while you’re at it — the problems section below. Trimming is cosmetics, not treatment.)
Everything else is tidying. Pull or cut dead leaves away at the base as they yellow out; a healthy plant retires its oldest outer leaves steadily, and one or two at a time is housekeeping, not a symptom. Cut spent flower stems at the base once their babies have been harvested or have browned — or leave a few, they do no harm. If the plant has produced more babies than the look can carry, trimming some stems entirely is fine; the mother redirects the energy to her leaves. And once in a while, wipe the leaves with a damp cloth: those broad ribbons collect dust, dust costs light, and the wipe doubles as your pest inspection — check the undersides for the cottony tufts of mealybugs or the brown discs of scale while you’re there.
Varieties at a Glance
All of these are the same species with the same basic care. What changes is how much light their coloring costs them: white tissue does no photosynthesis, so across the whole family, the paler the plant, the brighter it needs to be and the more willing it is to revert in the dim.
Solid green is the original plant — Chlorophytum comosum as it grows in the wild, all-green leaves with a paler green midrib. It’s the toughest of the group, the most tolerant of lower light (there’s no pattern to lose), and oddly the hardest to find in shops, because the striped forms outsell it. If your spot is dim, hunt this one down.
‘Vittatum’ is the classic Victorian parlor plant: green leaves with a broad white-to-cream stripe down the center. It’s the variety most people picture, a vigorous grower with long stems and plentiful babies, and the one against which the others are measured.
‘Variegatum’ flips the pattern — white or cream edges around a green center — and tends to be a touch wider-leafed and more compact than ‘Vittatum’. It’s the form most garden centers stock now. Same care; it just shows its light hunger at the edges first.
‘Bonnie’ is the curly one: ‘Vittatum’-style striping on leaves that twist and spiral as they grow, babies that curl the same way, and a noticeably more compact habit overall. She’s the pick for a small shelf or desk where a full-size spider plant would take over, and since her leaves are shorter, she shows off in a pot on a table better than in a basket.
Reviving a Neglected Spider Plant
Found a sad spider plant — a dried-out basket from a relative, a forgotten office plant? They’re remarkably revivable:
- Trim all brown, crispy foliage to the base — it won’t recover, and cutting redirects energy.
- Check the roots: white or tan tuberous roots mean alive; black mush gets trimmed away.
- Repot in fresh mix if the soil is old, compacted, or smells off.
- Water thoroughly, then place in bright indirect light.
- Wait: new leaves emerge from the center crown within 2–4 weeks.
Even a plant reduced to a stubby crown with healthy roots usually regrows. Spider plants want to live — give them the basics and they do the rest. And if you’re dealing with a jungle — babies with babies, a tangled mass — it’s fine to remove entire baby-laden stems at the base; the mother redirects that energy into new foliage, and you get dozens of propagations out of the tidy.
Common Problems Preview: The Short Answers
Start with the symptom — then read the short answer below it:
| Symptom | Likely cause |
|---|---|
| Brown tips | Water chemistry (fluoride, salts), inconsistent watering — dry air is a minor player |
| Pale, washed-out leaves | Too much direct sun |
| No babies | Too young, too dark, or over-fed with nitrogen |
| Yellow leaves | Overwatering |
| Brown spots | Bacterial leaf spot from water sitting on leaves — water the soil, not the foliage |
| Tiny flies | Fungus gnats — the soil is staying too wet |
Most spider plant trouble announces itself on the leaves. These are the honest short versions — each with the door to the full diagnosis where the site keeps it.
Brown tips — the headline complaint. Almost every spider plant grows a few eventually, and the ranking of causes surprises people. For most homes, it’s what’s in the water: spider plants are unusually sensitive to fluoride, and to the salts that build up from fertilizer and hard water — the leaf tip is where the plant deposits what it can’t use, and the tip dies there first. Dry air and drought play supporting roles (a plant that dries hard between waterings concentrates those salts), but the guidebooks that blame humidity alone are sending you to buy a humidifier for a water problem. The working fixes, honestly ranked: switch to rainwater or distilled water for a while and watch whether new growth stays clean; flush the pot to wash out accumulated salts; feed less. And know what won’t fix it — leaving tap water standing overnight removes chlorine but does nothing to fluoride, standard pitcher filters don’t remove fluoride either, and boiling actually concentrates it. The full chemistry — chlorine vs chloramine, what each filter type really does, and how to read your own plant’s pattern — is in our guide to spider plant brown tips, which is where this fight is properly fought.
Pale, washed-out leaves. A plant that looks bleached and limp-grey has usually been left dry too long — water it thoroughly and it should re-green and firm up within a day or so. Pale with scorched patches, on a plant in strong direct sun, is sunburn instead: move it out of the hard light. Chronic pale, slow growth in a dim room is just the low-light budget; brighter light (or the solid green variety) is the fix.
No babies. Nearly always one of four things: the plant is under a year or two old, the light is too low to fund flowering, the pot is roomy enough that the plant has no push to reproduce, or it’s late winter and the short-day trigger hasn’t come round. Bright light and patience fix most cases; a repot into a bigger pot is the one move that works against you here.
Yellow leaves and a soft base — root rot. Yellow leaves scattered through the plant (not just the oldest one retiring) and especially a soft, mushy feeling at the base mean the roots have been sitting wet too long. Unpot it, cut away every brown or mushy root back to firm white tissue with a clean blade, repot into fresh free-draining mix, and water sparingly while it re-establishes. If tiny black flies rise from the soil when you water, treat them as the early-warning system of that same too-wet mix — our fungus gnats guide has the full eviction, and the prevention is the watering rhythm in this guide.
Pet Safety: One of the Genuinely Safe Ones
Short version, because pet owners come to this section with a specific worry: spider plants are non-toxic to cats and dogs. They appear on the ASPCA’s list of plants safe for pets, which makes them a rare thing in the houseplant world — a plant you don’t have to place defensively, hoist out of reach, or apologize for. If your household includes a cat, a puppy, or a toddler with opinions, this is one of the easiest recommendations I can make. (For contrast, the other classic trailing plant needs more respect: our pothos care guide covers a plant that looks just as innocent but does have to be hung out of chewing reach.)
The one honest footnote is about the plant’s safety, not the pet’s. Cats find the dangling babies and arching, grass-like leaves nearly irresistible to bat and nibble, and a determined cat can worry a spider plant ragged. Chewing a lot of any leafy green can give a cat a mildly upset stomach, toxicity or no — so if yours becomes a feline hobby, hang the plant up high. You’ll be protecting the spider plant. The cat was never in danger.
Frequently Asked Questions
How often should I water a spider plant? Whenever the top inch or two of soil has dried out — in most homes, about once a week in spring and summer and every couple of weeks in winter. Push a finger in and let the soil decide; the calendar version of this answer is how spider plants get drowned, because a bright room and a dim one run on different clocks.
Why are the tips of my spider plant’s leaves turning brown? Usually it’s the water, not the air: fluoride and accumulated salts from tap water and fertilizer concentrate at the leaf tips and burn them. Switch to rainwater or distilled water, flush the pot to clear the salt buildup, and feed at half strength or less. A little brown is nearly universal on this plant and purely cosmetic — trim it with the sliver rule while the cause gets fixed.
Why isn’t my spider plant producing babies? Because babies are a mature, well-lit plant’s project. The usual missing ingredients are age (under about a year or two), light (too dim to fund flowering stems), and pot size (too roomy — they flower more readily when snug). Short autumn days help trigger the stems, so a plant that’s been sulking may start in fall once the light is right.
Are spider plants safe for cats and dogs? Yes. Spider plants are listed as non-toxic to cats and dogs by the ASPCA, so they’re one of the genuinely pet-safe houseplants. The realistic risk runs the other way: cats love batting and chewing the dangling babies, so hang the plant if it becomes a target.
How do I know when my spider plant needs a bigger pot? When the evidence says so: thick white roots escaping the drainage holes or circling the surface, the plant visibly pushing itself upward as the root mass grows, or water running straight through so it’s thirsty again in a day or two. Move up just one size — an inch or two — ideally in spring, and remember that snug is not a problem for this plant; it actually encourages babies.
Can a spider plant live in low light? It can live there, yes — it will sit, alive and green-ish, for a very long time. What it won’t do is thrive: growth slows, the babies stop, and striped varieties grow in plainer as the plant builds cheaper, greener leaves. If the dim spot is non-negotiable, the solid green variety handles it best. Bright indirect light is where this plant becomes the fountain it’s famous for being.
Should I root the babies in water or in soil? Both work, and the most reliable method is neither: pin the baby into a pot of soil while it’s still attached to the mother, and cut the cord once it roots — it never has to survive alone until it has roots. Of the cut methods, soil is less fuss (no transplant step later) and water is more fun (you can watch the roots). Pick by temperament.
How fast does a spider plant grow, and how big will it get? Fast, by houseplant standards: in bright light a young plant can fill out its pot within a season, and the leaf fountain typically reaches one to two feet across, with baby-laden stems trailing two feet or more from a basket. A potted baby can be making babies of its own in about a year. It’s one of the quickest rewards in indoor gardening — which is exactly why it keeps being handed to beginners.
Why are my spider plant babies turning brown? Usually low humidity or inconsistent watering while they’re still attached — they’re living off the mother’s supply line, and they feel every drought first. They’re also sensitive to fluoride, same as the mother. A baby that’s browning badly is telling you the mother’s water story needs fixing; root the healthy ones and trim the worst.
How long do spider plants live? Decades with basic care — they’re one of the longest-lived common houseplants. Old plants just need occasional repotting and division, and many a household spider plant is older than the furniture it hangs over.
Give a spider plant bright light, a pot that drains, a drink when the top of the soil dries, and clean water if its tips complain, and it will do the rest itself: fountain, flower, and hand you a dozen new plants a year to give away. It’s the rare houseplant that makes its owner look skilled. Start with one on a bright shelf, and don’t be surprised when the babies take over the neighborhood.
One Comment